Graphic World

Categories
Learning Post

The 5 best new 3D tools for June 2017

We’re alreay halfway through the year and developments in the world of 3D artdon’t show signs of slowing down any time soon. With plenty of tools and updates hitting the scene, let’s dive in with the top 5 tools for June.

1. Laubwerks

Laubwerks are touted as the best foliage kits in the business

If you’re into architectural visualisation or environment work then it’s very likely that you will need foliage of some kind. Over the last few years Laubwerk have produced some of the best quality foliage packs around.

What makes them special is not just the excellent models and accompanying textures but the implementation. Not only doe they ship plugins for various host apps but the Laubwerk player also lets you dial in attributes for your plants, from age of plant to the season, with materials and meshes responding appropriately.

Now, Laubwerk have released their first shrub pack, as well as a new Maya player, bringing these top quality kits to an even bigger user  base.

2. Modo 10.1

10.1 adds a large feature list to the previous release and will please modelers

Not that long ago the foundry announced their new model for development of modo and now we are seeing the results of the second edition in this series, 10.1.

10.1 is solidly focused on modelling and brings to the table far more than can be talked about here but the highlights are some huge additions and improvments to MeshFusion, the versatile Boolean system.  With similarities to Zbrush’s shadowbox it allows the user to create Booleans from different angles, making complex shapes far easier than traditional methods.

Also a big new feature, and one that joines forces with other areas of modo, is the procedural modelling system,. With many uses it’s hard to describe fully here but see it as a way of creating and editing models non destructively, with operators able to be freely moved, adjusted and animated.

10.1 is a big release so head to the product page to read more and see some of the demo videos.

3. Guide to GPU rendering

In depth guide to rendering on the GPU is free to all registrants

The battle for rendering supremacy is raging away, with both GPU and CPU camps having good points to make. However understanding the benefits of one system over another is not always that simple but Chaos Group Labs have come to the rescue, with this in depth and best of all, free guide on how working with a GPU can make your life as a cg artist easier, or at least quicker.

Of course there’s a slant towards V-Ray but that is in some ways irrelevant. The pros and cons are the same and the authors have put together a really comprehensive guide, covering everything from compute power background and history to what the future could hold.

4. Spline connect

The most efficient way of connecting spline segments is only $15

Default Cinema 4D installs don’t provide a way of easily connecting spline objects but Mike Udin, has the answer. His new Fast Spline Connect plugin, available from cgtools, makes it about as simple as any command can be.

At just $15 it’s impossible to resist if you ever work with splines and should really be a part of the standard feature set. Seeing as Cinema 4D has such a large user base we can certainly see this being a popular plugin.

5. Autodesk Industry collections

Autodesk’s new collection is a rent only affair, although cheaper than pervious iterations

If you are a fan of Autodesk software but your budget prohibited signing up tho their subscription service there’s some good news. The big ‘A’ have reshuffled their software suites into ne ‘industry collections’, which contain the same core products as before, although obviously not softimage, and they come out at a fairly substantial reduction in yearly cost (around $300 depending on your choices).

On top of this the new collections also sign you up to a new cloud service, for rendering, storage and other tools like the character builder.

There will no longer be the option to buy a perpetual license however, so if you really need to use the software plan ahead.

Categories
Landscape Post

How to Transform a Home Garden into a Peaceful Wonderland

Creating an extension of indoor living is one of the favorite hobbies of a layman. Making a beautiful outdoor in the form of a garden always creates a natural and soothing environment and to achieve desirable results we have plenty of techniques to make a wonderland into our lawn by beautifying our surroundings.Putting an outdoor fountain or waterfall as a garden decorative structure reinvigorates the natural ambiance of our garden and breaks its silence. It brings the residence much closer to nature by influencing their imagination. Having a glimpse of the whirling water of the fountain also overwhelms one’s feelings. The sound of trickling water brings a feeling of tranquility to a yard and is also effective visually for decoration. Enjoy our collection of rock garden ideas and discover how to transform a home garden into a peaceful wonderland!

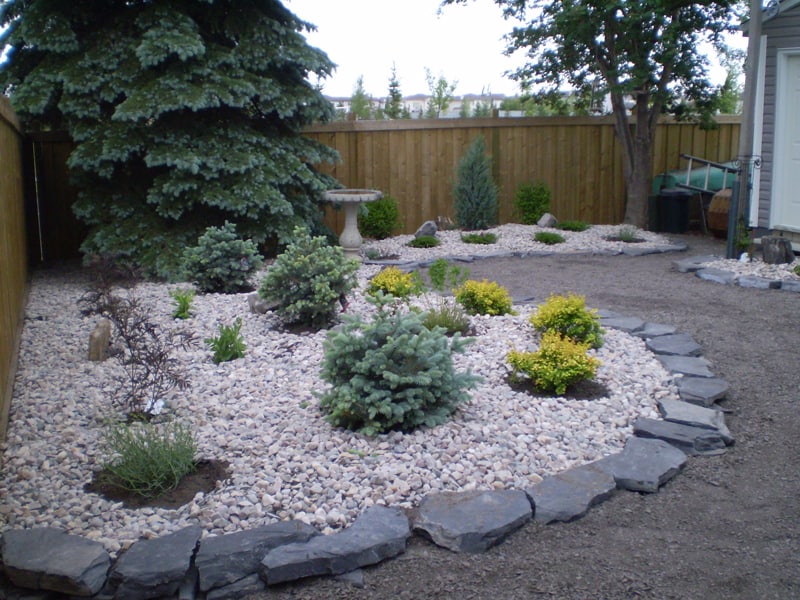
rock garden-designrulz (1)

Rock Garden Ideas to Make Your Garden Looks More Natural

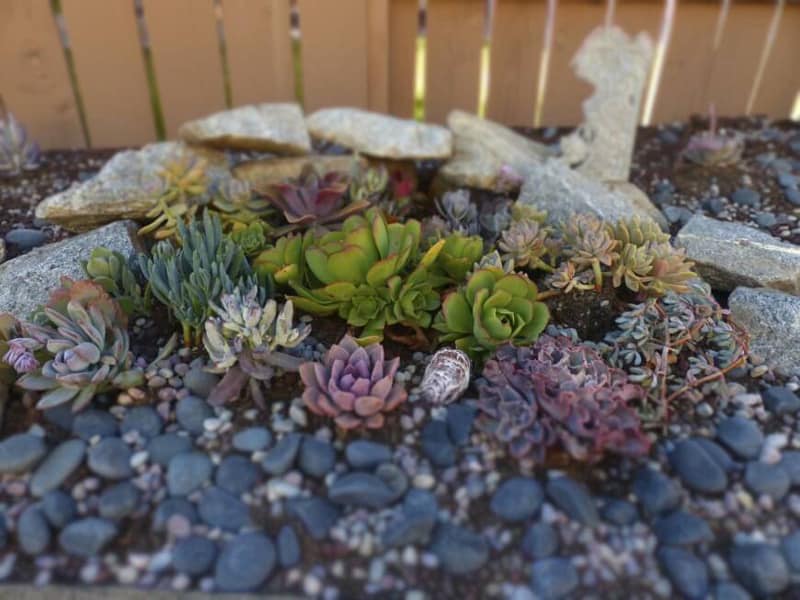
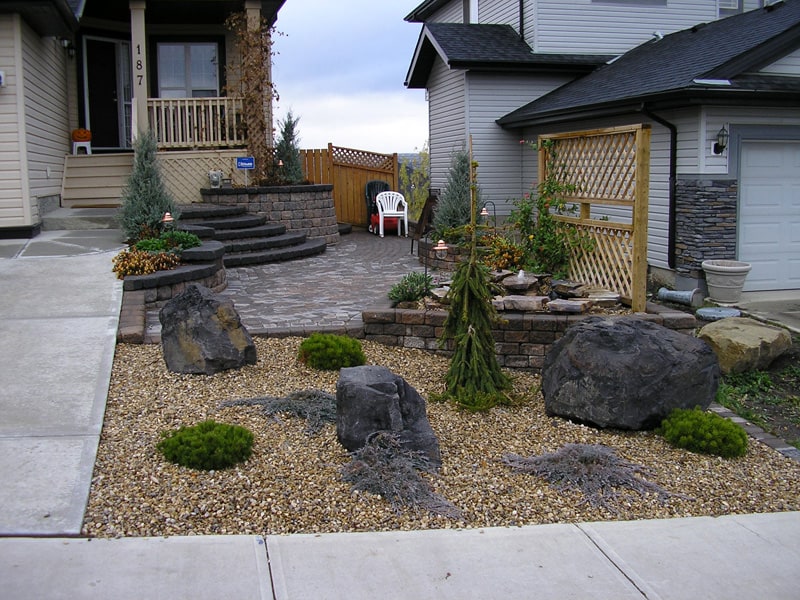
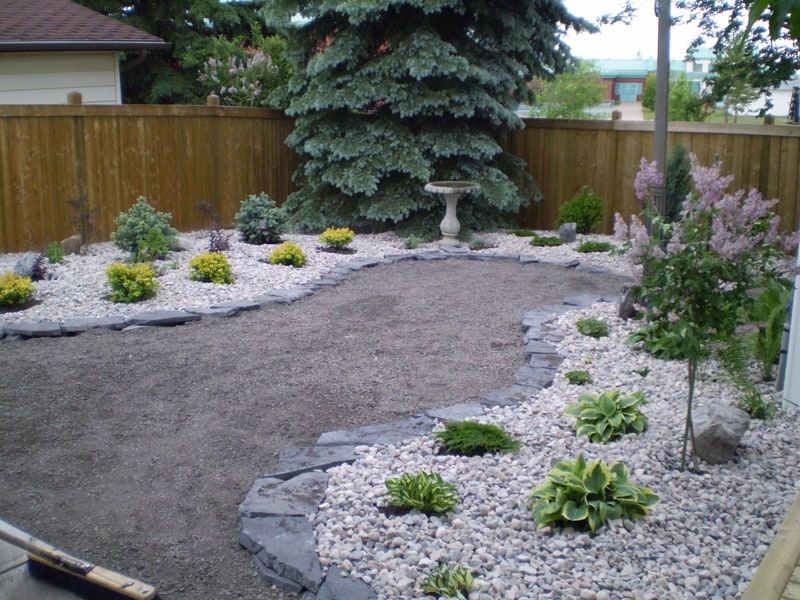
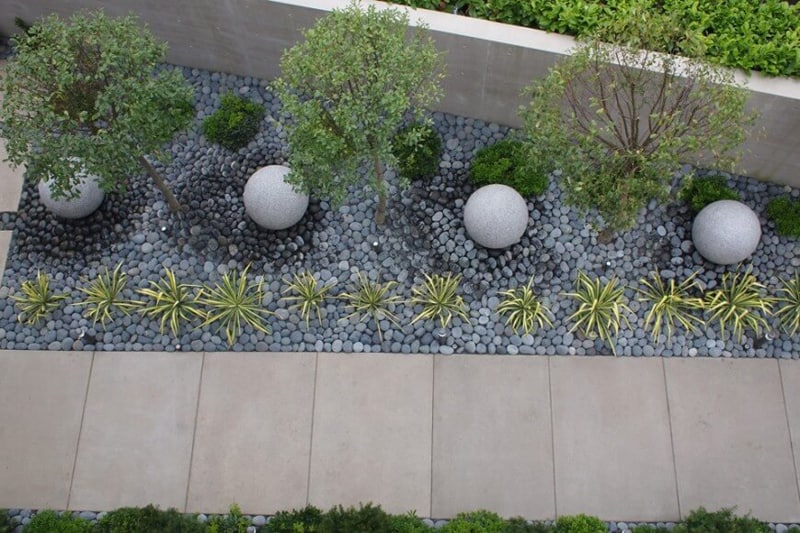
Organic and natural materials should be anyone’s first choice when decorating the outdoors and having a rock garden should definitely be on your wishlist this summer. Rock garden ideas becomes one of the most interesting ideas that is worth to be applied on the garden of your home in order to make it looks more natural. Rock gardens are an amazing way to build texture and depth into your backyard. Find 30 Rock Garden Ideas to Make Your Garden Looks More Natural.

Garden becomes one of the things that are commonly owned by people on their home. it is not only able to make their home looks more perfect, some great gardens even can become a great place that makes the owner of the home feels more relaxed on.

rock garden-designrulz (2)

Why cultivate a rock garden? They’re low-maintenance. They’re in season all year round. They add variety to the landscape. Need another reason? Check out the inspirational pictures below. Combining the plants with the rock or stone becomes an interesting idea to be tried for making your garden looks more attractive. You can even apply some rocks in big size to be combined along with plans on your garden for creating more perfect natural look.  Use rocks to transform your plain and boring backyard into a beautiful and relaxing oasis. Use their sculptural beauty to create eye-catching designs and try to make them look as natural as possible in the setting you’re providing.

rock garden-designrulz (3)

Stones are not very expensive. If you are lucky enough to know where to find free rocks, you may not have to pay anything at all. If you need to purchase stones there are lots of options in a variety of shapes and sizes. Depending on the type of stone you choose, you can expect to spend $155 to $204 per one ton of stones.

rock garden-designrulz (4)

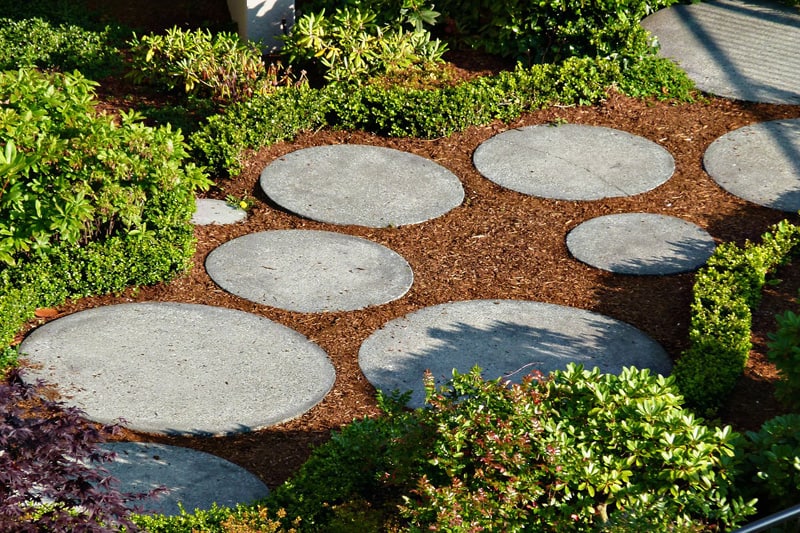
Speaking of pathways, note how path and garden cleverly merge in the image below. Don’t be afraid to have fun with your rock garden layout, letting elements of your creativity shine through.

Many kinds of rocks can absorb a great deal of heat. They also reflect a significant amount of heat from their exposed surfaces. The heat reflecting off of the rocks makes the area warm during the day, and the heat absorbed is released at night, making the area also warmer at night. If you are not looking to make your area hotter all around a rock garden may not be for you.

rock garden-designrulz (5)garden-designrulz (1)garden-designrulz (2)

OLYMPUS DIGITAL CAMERA
garden-designrulz (4)rock garden-designrulz (6)rock garden-designrulz (7)rock garden-designrulz (8)rock garden-designrulz (9)rock garden-designrulz (10)rock garden-designrulz (11)rock garden-designrulz (12)rock garden-designrulz (13)rock garden-designrulz (14)rock garden-designrulz (15)
OLYMPUS DIGITAL CAMERA

rock garden-designrulz (18)rock garden-designrulz (19)rock garden-designrulz (20)rock garden-designrulz (21)rock garden-designrulz (22)rock garden-designrulz (23)rock garden-designrulz (24)rock garden-designrulz (25)rock garden-designrulz (26)rock garden-designrulz (27)rock garden-designrulz (28)

Categories
Post

Creativity and the Brain

Neuroscientists keep trying to unlock the mystery of what sparks visionary thinking and artistic invention.

It was 60 years ago, at the start of his career, but the architect and educator John P. Eberhard remembers the very moment the idea came to him for what would be his seminal creation: the modular church. He’d been approached to design a chapel for a new congregation in Champaign-Urbana—a kind of starter church that could be erected quickly, disassembled, and moved when the congregation outgrew it. “I remember having ideas roll around in my head about what it could be,” Eberhard recalls. “I remember when I got the big idea: visiting my parents, sitting in their bedroom, rocking in a rocker. All of a sudden, into my head came this whole idea of designing a chapel out of wood panels bolted together, with equilateral trusses, two-by-twelves with split-ring connectors, four-by-eight plywood panels. The whole idea was there.”

Out of that flash of insight came a business— Creative Buildings, Inc., which in the 1950s sold more than 100 prefab churches around the country—and a lifelong interest in the nature of creativity by Eberhard, former chair of the School of Architecture at Carnegie Mellon. His account of an idea’s arriving, fully formed, seemingly out of nowhere, corresponds closely with how at least one classical musician approached composing. While walking or resting, he wrote, melodies would come into his mind “whence and how, I know not,” taking root and growing until the piece “stands almost complete and finished in my mind, so that I can survey it, like a fine picture or a beautiful statue, at a glance.” The composer was Mozart.

Separated by hundreds of years and the gap between a successful professional and a world renowned genius, they describe in almost identical terms one of the most sublime and elusive events in human experience, the “eureka moment” of creativity. It has tantalized philosophers and poets, who imagined it could only come directly from God—Ibsen spoke of receiving “the spark of the divine fire”—and more recently scientists, who have begun looking for objective correlates to creativity in the brain, just as they do for perception, movement, and memory.

But they haven’t gotten all that far, according to Nancy Andreasen, author of The Creating Brain: The Neuroscience of Genius (2005). Nineteenth-century theorizing that linked creativity to traits such as left-handedness and stammering haven’t been borne out, and neither has the left-brain/right-brain distinction (the one on the right was the part you were supposed to use in artistic ventures) that sold so many magazines in the 1980s. Even the common-sense assumption that originality correlates directly with intelligence has been debunked: the consensus today is that success in a creative field requires a threshold IQ of around 120—equivalent to about the 90th percentile—but, beyond that, you don’t have to be an Einstein to be Einstein. One problem, Andreasen notes, is that modern neuroscience relies heavily on putting subjects in MRI machines that measure activation in different regions of the brain under specific conditions, but, once you get them in there, how do you detect creativity? Wait for them to compose a symphony or design a building in their heads?

Andreasen has done some of this research herself; as a neuroscientist at the University of Iowa, she is particularly well situated for it, since the Iowa Writers’ Workshop attracts a steady stream of poets and novelists to the campus, a resource she has been supplementing with visual artists whenever she can lure one. (She hasn’t had the chance to study an architect yet; anyone reading this with a few days to spare in Iowa can give her a call.) Her early work used stratagems to elicit creative activity, such as giving people five words and asking them to write a story around them. She decided it was a waste of time: the task didn’t engage them sufficiently; it activated regions of the brain involved in language processing, which didn’t seem to capture anything unique about the creative effort.

Eventually she concluded that there is no dedicated area for creativity in the brain, in the way that, say, the prefrontal cortex handles the planning and decision-making processes neuroscientists call “executive function.” Creativity is a function of forging relationships and making connections; it is a way of thinking in metaphors that cut across not just the psychological borders of the mind but the physiological boundaries of the regions of the brain. V.S. Ramachandran, a pioneering neuroscientist at Cambridge University, discovered that artists, poets, and novelists have seven times the normal incidence of synesthesia—the peculiar phenomenon in which one form of sensation (hearing a passage of music, for instance) is experienced as another (a particular color or smell). In The Architect’s Brain: Neuroscience, Creativity and Architecture (2009), Harry Mallgrave relates this finding to architecture, quoting a disciple of the late Venetian architect Carlo Scarpa, who believed he “worked entirely through a synesthetic process that entailed, on the same pages of sketches, different colors and styles of drawing with different media. It was through these ‘bundles of intertwined sensory perceptions’ … that Scarpa was able to modulate his multisensory ideas—say, red of a waxy pencil from the red of a brick from an identical red of India ink.”

The parts of the brain that seem to show more activity in creative people (compared to Andreasen’s control subjects) are the “association cortices,” regions that are markedly more developed in humans than other animals and also among the last to mature, continuing to develop into the early 20s. Their function is to process the output of the primary sensory areas, identify phenomena, and make connections among them. How do we see a face? The retina receives light and transmits nerve impulses; the primary visual cortex resolves these into a form, with shape and color; the visual association cortex recognizes and categorizes it and compares it to a summer’s day.

And it is these areas, Andreasen found, that are most active during the condition she describes as “randomly wandering unconscious free association”— the condition described by Eberhard, rocking quietly in his parents’ bedroom, Mozart strolling through the streets of Salzburg, or the 19th-century chemist August Kekule dozing off in front of the fire and waking with the structure of the benzene molecule dancing in front of his eyes.

Of course, dozing by itself isn’t enough to guarantee immortality. The eureka moment, as described by Andreasen and others, is only the third of four steps in a creative process: preparation—acquiring the basic background knowledge to make a contribution to a field; incubation—trying out various ideas and approaches; insight— the sudden apprehension of a solution; and production—putting the idea into practice. Naturally, insight gets most of the attention from researchers, and it’s the part that aspiring artists tend to focus on, as having the highest ratio of psychic reward to effort.

But even Mozart needed to study and practice, despite his phenomenal and precocious natural gifts. In fields less abstract than music—such as physics or architecture—that is especially true: almost any idea in science, however original, must at least partially fit into the framework of existing knowledge, and a building has to stand up. “Creativity is a process of focusing on something with discipline, of training the brain to think while working,” says Mallgrave. Faced with a difficult problem, “we sleep on it, take a shower, and suddenly we have an answer to where to put that door.”

Ah, yes, the eureka moment, the idea flitting at the edge of our consciousness, just beyond our apprehension. It will come to us when we are prepared to receive it—though it often comes with a price; the idea that creativity bears a relationship to mental illness is not without foundation, says Andreasen. The characteristic affliction is mood disorder, which she finds extremely common among the writers and artists she has studied, in their siblings and offspring, and in the historical record. Among her first subjects was Kurt Vonnegut, who suffered from depression, and whose immediate family had both a high incidence of mental illness and creativity in numerous fields. (His father was a successful architect.)

And there is at least a metaphoric connection, if not a definitive statistical one, between creativity and schizophrenia, both of which involve a state in which mental lines break down and free association reigns. Researchers at Berkeley back in the 1950s and ’60s administered the standard test of mental health, the MMPI, to writers and architects who were considered especially creative and found they scored suspiciously high on the scales of schizophrenia and paranoia. But, as the Harvard psychologist Shelley Carson points out, in an essay with the provocative title “Creativity and Psychopathology,” that reflects a tendency, not an actual diagnosis. Patent schizophrenia is incompatible with productive work in most fields, especially those whose end products have to meet safety and fire codes. The other mental state characterized by hyper-free association is, of course, the one we enter into when we take drugs. Perhaps the most celebrated eureka moment in history was the opium-induced dream of Samuel Taylor Coleridge, out of which came the psychedelic thunderstorm of the opening stanzas of “Kubla Khan.” It was a dream, of course, about architecture.

Did you enjoy this article?

Categories
Post

Basic Modelling Techniques in 3ds Max

Basic Modelling Techniques in 3ds Max
526_tid_41.jpg
Here I will show you some of the basic concepts that many students of Max might overlook because they are focused on modelling characters right off the bat. While this is fine, it also makes for a frustrating experience when someone new to Max wishes to unleash their creativity.Therefore this is my main focus here, to help you understand some of the basic things you should have under your belt concerning using this programme in order to free the artist within you!What we are going to start with is learning how to use our Primitives to enable us to quickly get modelling. This is a powerful way to not only create or model quickly, but it can also be a great way of getting some ideas down in 3D space. Remember the point here is to unleash your creativity!The first thing that we must have in our minds is what we are going to model. However, sometimes just letting yourself go is a great way to explore your own creativity. But for this project I am going to begin thinking that we are going to try and model some kind of reactor. This is where I will start, but if we end up somewhere else, it’ll be okay because if our creativity begins leading us down a different path it is best to follow it. Of course, if you are being paid to model something specific then veering off that path will not end well for you. But with this exercise – which is exactly what this is going to be: an exercise – we will not have those constraints.Let’s begin!

1. Open Max, and under the Create tab change the Standard Primitives drop down to Extended Primitives, and then create a Chamfer Cylinder in the centre of the Perspective view. Remember that most of the Extended Primitives have 3 creation parameters that must be created: Radius, Height and Fillet. Here is what it should look with all three parameters created (Fig.01).

526_tid_01.jpg

Fig. 01

This is the only object we will create.  Everything else we do from here on out will be copies of this object.  We are also not going to convert it to an Editable Poly because, while it will give us control over the object at the sub-object level, we will lose the power to adjust and manipulate the Chamfer Cylinder primitive.  This is important and much overlooked.Â
Just

so we are all on the same page, select this cylinder, go to the Modify tab and make the following settings, shown in Fig.02.

526_tid_02.jpg

Fig. 02

2. Alright, now using the Move tool, hold down Shift with the LMB (left mouse button) and move the cylinder up on the Z axis a little, then release the mouse. In the window that opens ensure that Copy is the selected method and hit OK (Fig.03).

526_tid_03.jpg

Fig. 03

Note: from this point on, I am not going to describe in detail how to make these copies, I will assume that you now understand how to do it!

3. Now let’s adjust this new cylinder’s primitive properties, so go to the Modify tab, make these changes and then move the cylinder dow, like so (Fig.04).

526_tid_04.jpg

Fig. 04
4. Make another copy and move it up (Fig.05).

526_tid_05.jpg

Fig. 05

5. Copy it, switch to the Front View and then move it down and make these adjustments (Fig.06).

526_tid_06.jpg

Fig. 06
Categories
Articles Learning

WHAT IS 3DS MAX? AN INTRODUCTION …

WHAT IS 3DS MAX? AN INTRODUCTION …

Introduction to 3ds Max for beginners:

This awesome piece of software consists of 3D modeling design, realistic animation, and renders of 3D models. There is a free 3ds max trial version to try out (See the 3ds Max download below). You can purchase the software at the link below. Also, students get to


Introduction to and history of Autodesk 3ds Max

Developed and produced by Autodesk Media and Entertainment, Autodesk 3ds Max is software for rendering 3D animation, models and imagery. It was originally called 3D Studio and was created by the Yost Group of Atari for work on the DOS platform, and development started in 1988. It later was adopted for Windows NT with 3D Studio DOS release 4 and was subsequently renamed 3D Studio MAX. 3D studio MAX, also developed by the Yost group was produced by Kinetix, which was then the media and entertainment division of Autodesk. It was the release 8 of the original 3D Studio, which was renamed Autodesk 3ds Max which was made available to the public in 2009. 3ds Max offers much functionality targeted towards ease of use and faster image and animation rendition.

Major Applications of Autodesk 3ds Max

The software is used in developing CGI as well as applications ranging from academia to game development. Each use of the software requires the use of a different set of tools available in the software and as plug-ins. 3ds Max is available free of cost for students. However profession packs are available for sale.

Major Features of Autodesk 3ds Max

Autodesk 3ds Max is primarily, although not completely, based on polygon modeling. Polygon modeling is used more extensively in game design than in other animation application as it offers a highly specific control over individual polygons that make up the model. This feature of polygon modeling also allow for greater optimization of the model.

Usually, the design process begins at the selection of a primitive model bundled with 3ds, which is then further refined as per need. The current versions have a simplified mesh editing interface and using the ‘edit poly’ modifier which moves the tools available in the primitive model, higher in the modifier stack, allowing them to be used on top of other modifications.

In the 3ds Max software various unique primitive shapes such as teapots, cones, pyramids and cubes are available which can be used as a base for model development.

Although polygons are the method of choice for model building, surfaces are easier to define using other methods. 3ds Max’s subdivision surface support allows for smoothened surfaces and with the use of tools like Soft Selection, which allows manipulation of vertex clouds into the desired shape without distortions from unwanted shapes and displaying smooth surfaces. The sculpting brush feature allows smooth surfaces to be drawn by hand, if polygons give a distorted image, although functionality is limited.

The NURBs feature of Autodesk 3ds allows smooth surface rendition by use of mathematical formulae and is of greatest use to in accurate simulation of mechanical parts. This is of greatest use in applications such as automobile design and instrument design.

3ds Max allows the use of custom lighting and shadows and highlights can also be ‘burned’ into the image rendered. These settings are mostly used for game imagery, since pre-fit values of shadows and highlights allows the game engine to process less data thereby improving game speed and performance as the model is already painted with the required modifications.

This also means that for constant lighting conditions during play, especially if motion is involved, the images do not falter and give a constant, regular image, free of improper shadows and bad graphics.

For life like character models, 3ds Max includes simulation for hair, skin, cloth and fur, all requirements for simulation of living beings. These inbuilt add-ons reduce the time required for model development and improve the detail for each frame.

It also includes rigid body dynamics which means that simulation of hard bodies such as wood or bricks, is easy to perform. This software is also equipped with features like shatter effect to recreate the dynamics of shattering rigid objects. However, soft body dynamics, which allows for the motion simulation of deformable objects, is not supported by 3ds Max, which makes simulation of such objects difficult.

A very useful feature of this software is the support for Inverse Kinematics and Forward Kinematics. Inverse Kinematics or skeleton modeling allows the user to create a model and fit it with a skeleton, which can then be animated as per the requirements of the animator. This skeleton can then be placed inside the model, making the animating the model easier.


Tools available in Autodesk 3ds Max

* MAXScript: It is a scripting language which is built into the software and can automate repetitive tasks, give varying combinations of present features and developing tools and user interfaces. MAXScript can also be used to build plug-ins for 3ds Max.

* Scene Explorer: Scene Explorer provides an orderly, hierarchical view of scene data. It allows categorical editing of data, to achieve simplicity in editing complex sets and can also manage code in .NET.

* Character Studio: Initially a plug-in character studio is a tool for help in animating virtual characters, the Character Studio allows using stock skeleton animation to quickly and easily modify characters for a project which work on the ‘biped’ skeletal system.

* General keyframing: There are two keying modes; auto key and set key which provide support for separate workflows. The keyframing controls given help in easing the animation by providing simple, but important features like cut, copy and paste.

* Constrained animation: It allows animation of objects placed inside the constraints of their shape. This tool allows the animation of objects along curves with controls provided for smoothness, velocity, alignment, banking etc. and along surfaces.

* Skinning: Using with the Physique or Skin, a fine control of movement can be achieved and can be used in the most tricky of places.

* Integration with Autodesk Vault plug-in: The Autodesk Vault is a plug-in which is shipped along with 3ds Max and is used to integrate user data and assets on to one location, thus tracking progress on projects. Also, managing work in progress is an easier task. The plug-in enables users to safely and easily design, find, reuse and share 3ds Max models for a team production effort.


Conclusion

All in all, Autodesk 3ds Max is a useful software for learning and practicing animation and developing the skills required for 3D modeling and animation purposes. Along with having a very user friendly interface, it also can be used for managing professional projects in animation. One of the best features is added plug-in functionality which increases its features by a wide margin.

Categories
Post

10 free resume templates

10 free resume templates

Not all of us have the time or inclination to craft our own creative resumes, and arguably having a flashy or beautifully illustrated curriculum vitae printed on 130gsm paper is of far less importance than a well-presented design portfolio.

But your CV still needs to clearly impart key information about your career, while still displaying a little of your personality. We’ve had a search around and have found these 10 free résumé templates, each of which offers something a little different. Here goes.

01. Ikono.me

Resume and CV templates
A stylish resume template that includes a timeline of your employment history

This subtle yet stylish CV template features all the details you need to include, along with a neat sidebar holding a profile and references and a timeline – in which you can list your employment history. There’s also an online profile section to show just how social media-savvy you are and a software skills bar graph so you can show your exact skills. It’s supplied in PSD, AI and INDD formats.

02. Three in one

Free resume templates

This simple, elegant free resume template is one of many presented by Designscrazed. The design is separated into easy-to-read, clear section with an option at the bottom for you to add icons to list your hobbies and interest, which gives it a nice touch. The zip file contains three psd files to build your personal resume, cover letter and a portfolio web template should you wish. All layers are well grouped and easily edited in Photoshop.

03. Ultra minimal résumé

Resume and CV templates
Print on a different paper colour for added minimalism with this CV template

A lot of the time, less is more when it comes to CV and resume design – and this subtle, minimal template is perfect for communicating your work history and profile in style. There’s room for a photo (we’d suggest black and white) and you can either change the background colour or print onto coloured paper for a unique and stylish CV.

04. Résumé for icon fans

Resume and CV templates
This resume template has some super-stylised icons included

If icons are your thing, check out this free template (only free for a limited time, mind) from designer Fernando Báez. A sectionalised design, complete with stylish type and icons included (you get the CV in AI format and the icons in PSD), this resume is perfect for customising with your own icons to represent your interests and achievements.

05. Résumé for type fans

Resume and CV templates
A central typographic column enables you to list your skills

Sure, this may not be to everyone’s taste – but it’s certainly impactful. A central typographic column bursts out to boxes in which you can add your details. The resume is supplied in AI format so you can easily export a PDF – and comes in black and white so you can get creative with colours.

06. Simple résumé

Resume and CV templates
Open Sans is at the heart of this resume, making it easy to customise

Again, simplicity is the key here in a type-based CV (using Open Sans) that puts profile at the top, then lists experience and education in simple boxes with left-hand sub-headers. There’s also – and this seems to be a trend amongst résumé designers – a professional skills section enabling you to grade yourself out of five on software, code and the like (stick them all to five if we were you).

07. Clean résumé

Resume and CV templates
The Smart Object header makes it a cinch to add your own graphic to this resume

This highly-customisable resume template comes in PSD and AI formats and has a Smart Object header, meaning you can quickly and easily link in an image of your choice. It’s A4, 300dpi, with 3mm bleed – so completely print-ready. Just add your logo, bio, experience and so on and you’re ready to print and send.

08. Hadi Reda

Resume and CV templates
Super-minimal with a neat icon style, this resume is ace for designers

Keep it super-minimal with this resume template. Once again there’s a bar graph for your skills (which we’re still not sure about but some employers may like it) along with a neat icon style to represent your social media profiles and software competence. It’s supplied in layered PSD format.

09. Résumé that makes a statement

Resume and CV templates
It’s definitely worth experimenting with this contemporary resume template by Paolo Pettigiani

Maybe you’re looking to make more of a statement with your one-pager – in which case this typographic template by Paolo Pettigiani may be just the ticket. Easy to customise and available in AI format with all the necessary fonts and icons, it’s definitely worth experimenting with.

10. Long résumé

Resume and CV templates
There’s so much info on this resume template it could be a little baffling – so why not cut the neat design down to size?

A modern resume with room for everything you’d need to say about yourself and more, we like the placeholders for adding imagery and your personal logo or logotype in the header. There’s also a services list, skills graphs and client box. A comprehensive PSD resume that you may need to cut down to size a little.

Categories
Post

Free guide to VR to download today

Free guide to VR to download today

Download this free guide to VR today

Even though virtual reality is a big trend, not everyone knows how to do it. To help out, Chaos Group Labs just released a free VR Guide for artists and hobbyists who want to start a VR project, but don’t know where to begin.

Common pitfalls associated with VR are addressed through scientific research and production insights, culminating in step-by-step instructions that explain how to make VR stills and video.

The team behind it includes contributors from Chaos Group Labs, Legend3D’s VR division and the World Building Institute.

Topics include:

  • What are the differences between the current headsets?
  • Where should I place my camera to create the best experience?
  • How do I make sure people don’t get motion sickness?
  • Is there a correct height or scale that people will respond to best?

There are even sample architectural visualization examples that let people see how you can turn old or new pre-rendered content into a compelling VR experience using V-Ray. We’d urge you to check out the Salle Labrouste room: it’s quite amazing.

Download the free VR Guide today!

Categories
Post

How to get started in CG

How to get started in CG

3D World issue 205
Discover how to create an amazing 3D mech in the new issue of 3D World

With a cover tutorial on modelling, texturing and rendering a realistic mech, 3D World issue 205 focuses on hard surfaces and all things mechanical.

The issue gathers together leading CG artists, including Furio Tedeschi, Tor Frick and Paul Massey to discuss how to design, model and render robots and mech using modo, ZBrush, Maya and other leading software.


Get your copy of 3D World issue 205 here

Tutorials this issue cover getting started in Quixel 2, creating a dynamic dress in Marvelous Designer 5 and modelling foliage for arch-viz using 3ds Max and GrowFX. Plus, Hannah Kang updates Norman Rockwell as she reveals how to add personality to your ZBrush sculpts. All tutorials come with video, resource files and extra content.


Inside issue 205…

  • Feature: Creating the VFX for The Revenant
  • Feature: Making a 3D studio in Unity for VR
  • Artist Q&A: It’s a robot modelling and rendering special
  • Tutorial: V-Ray for Nuke, master the latest compositing software
  • Artist Showcase: The best art from the CG community
  • Reviewed: Poser 11, Redshift and Paint & Stick get tested
3D World issue 205
Learn from master artists to improve your 3D art
3D World issue 205
Experts share their processes and techniques for creating amazing mechanical marvels
3D World issue 205
Find out how to model, texture and scatter detailed vegetation for use in architectural imagery
3D World issue 205
Discover the best digital art from the CG community
3D World issue 205
Artist Camille Kleinman shares her process for creating a realistic dress in Marvelous Designer 5
3D World issue 205
Discover how to design, model and render a tank-inspired walking mech
Categories
Post

7 Amazing interior Design | Living rooms

Living room

From Wikipedia, the free encyclopedia

Overview

In homes that lack a parlour or drawing room, the living room may also function as a reception room.[1]

A typical Western living room may contain furnishings such as a sofa, chairs, occasional tables, coffee tables, bookshelves, electric lamps, rugs, or other furniture. Traditionally, a sitting room in the United Kingdom and New Zealand has a fireplace, dating from when this was necessary for heating. In a Japanese sitting room, called a washitsu, the floor is covered with tatami, sectioned mats, on which people can sit comfortably.

In larger homes in the United States and Canada, the living room may be reserved for more formal and quiet entertaining, while a separate room such as a den, family room, or recreation room is used for leisure and informal entertainment (e.g., a home cinema may be located there). A great room combines the functions of one or more of these rooms.

 `` (3)`` (2)`` (1)3866_517959724903469_207706354_n7739_704949192871187_1745742433_n46778_533714643327977_1120254105_n66423_613134108719363_454986625_n


Categories
Articles Learning

Introduction To Auto desk AutoCAD | DAY 14

Learn AutoCAD basics: DAY 14

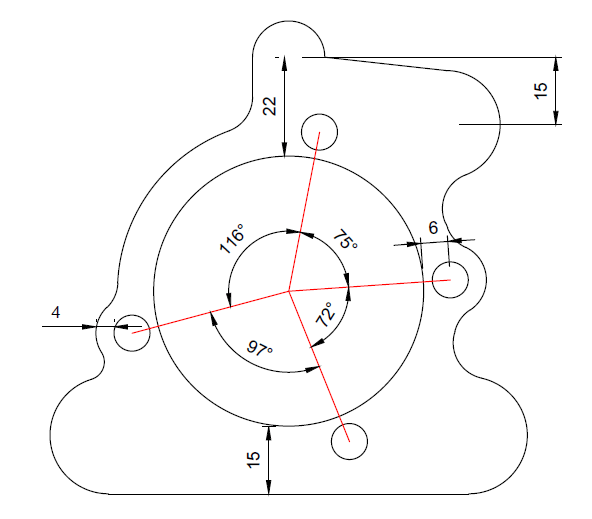
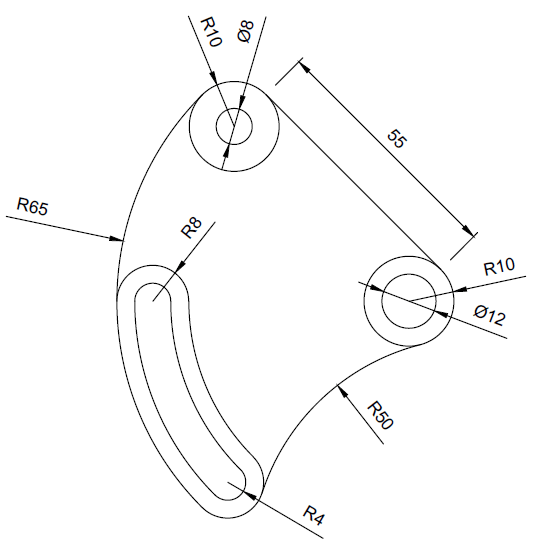
In this session there will be nothing difficult, except the fact that it will help you develop yoursense of analysis while using AutoCAD.

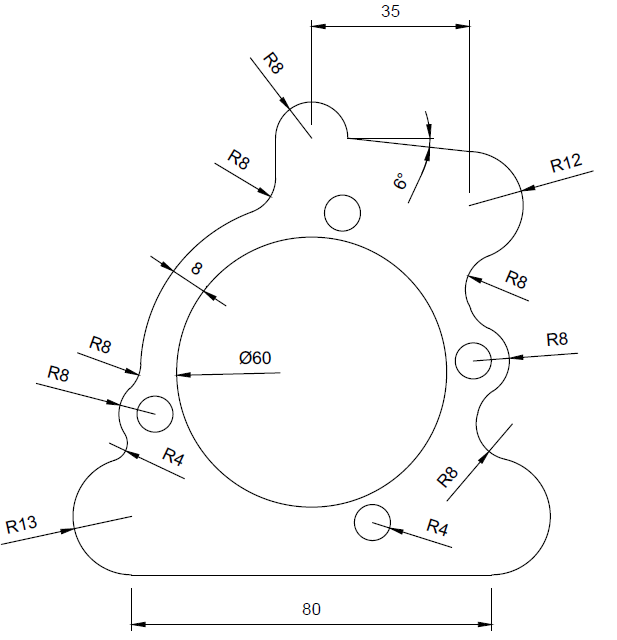
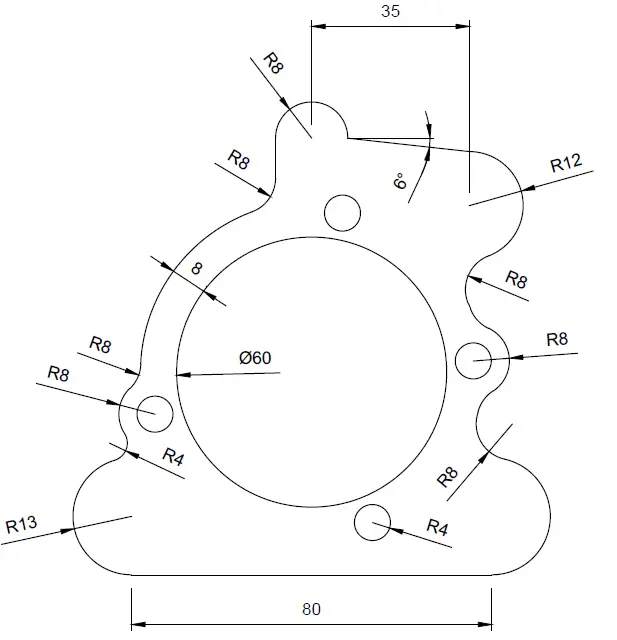
Looking at the exercise below, you should be able to, from a first look, determine all commands you need to be able to accurately replicate the object of today’s experiment.

You by now possess all you need to be able to complete the following without any problem


LEARNING AUTOCAD BASICS

FIGURE 1

learn-AutoCAD

FIGURE 2

learn-AutoCAD

hey! If you have any confusion about this, Just leave a comment below. Let me know what is confusing about this, I will make it clear for you

EXECUTION

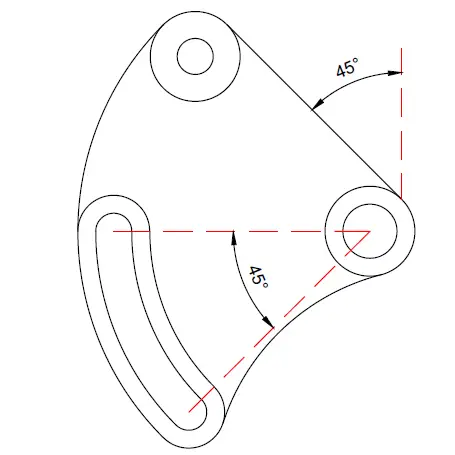
For some, figures above will not be self-explanatory enough, that is why we are bringing the following image. Pay attention to the skeleton-image used while creating the project, you will notice this is even easier that what it seemed at first.

learn-AutoCAD

Our suggestion will be to start from the base line (line of 80 units). All information are provided for this not to be a headache.

Feel free to drop a couple of words below in case of difficulties.

Categories
Articles Learning

Introduction To Auto desk AutoCAD | DAY 13

Learn AutoCAD basics: DAY 13

If you remember what we did in Learn AutoCAD DAY 7, you will notice that the following is quite similar to it. We had to learn how to use the OFFSET command and we have been using it throughout since sometime now. In this session, you have to use it as well.

 LEARNING AUTOCAD BASICS

We have bent this to push you to use the ROTATE command. But it you have eyes to look at the image in a more engineering point of view, you will quickly notice that you can draw the object without inclination angle and bending it just at the end of the project, but as we indicated earlier in this series, feel free to go free-style unless stated not to. But avoid wasting time!

Take the shortest way!


FIGURE 1

learn-AutoCAD

hey! If you have any confusion about this, Just leave a comment below. Let me know what is confusing about this, I will make it clear for you

FIGURE 2

learn-AutoCAD

If you have difficulties, check how we solved the exercise on Learn AutoCAD DAY 7 and Learn AutoCAD DAY 8 that may help you. This exercise is simply the combination of those projects.

Categories
Articles Learning

Introduction To Auto desk AutoCAD | DAY 12

Learn AutoCAD basics: DAY 12

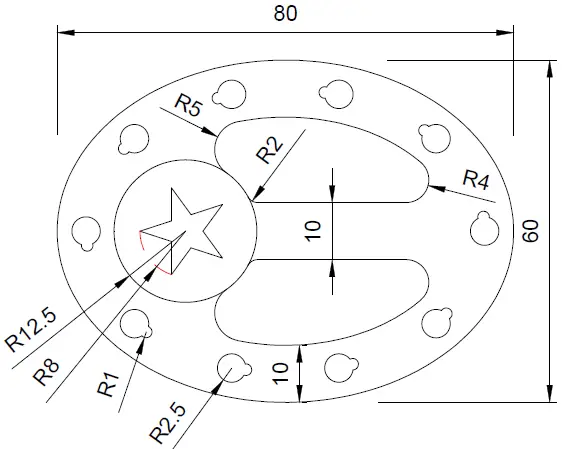
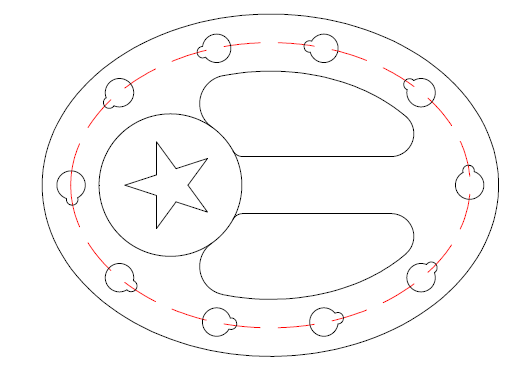
All here is a déjà-vu. Last session, we’ve learned how to use the ELLIPSE command in AutoCAD, in this session we are coming back with an even easier ellipse.

BUT, but now, the focus will be made on something totally different.

in Learn-AutoCAD-DAY-6, we have worked with the ARRAY command for the first time. Today you will need that command line more than EVER. And it is compulsory to have mastered it before trying the coming exercise.


LEARNING AUTOCAD BASICS

NOTE: Element in the array are equally spaced around the ellipse.

hey! If you have any confusion about this, Just leave a comment below. Let me know what is confusing about this, I will make it clear for you

FIGURE 1

learn-AutoCAD

FIGURE 2

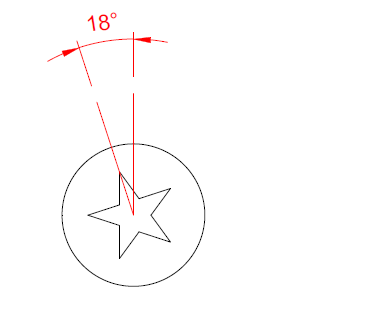
On the following image, the red line represent the PATH of the array. It resulted of an OFFSET of 5 units from the outer ellipse.

learn-AutoCAD

MORE DETAILS ABOUT THE STAR

learn-AutoCAD

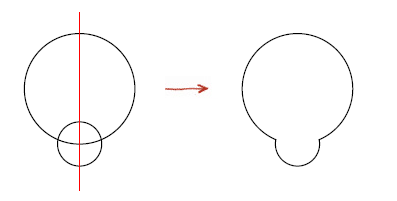
OBJECTS IN THE ARRAY

The object in the array is nothing but the following

learn-AutoCAD

You can find dimension of the circles on the first image above.

EXECUTION

The only thing that might be hard to accomplish here is the array. There is nothing like ARRAYELLIPSE in AutoCAD, what you need to do to create this array is using the ARRAYPATH.

To use the ARRAYPATH command using an ELLIPSE, you need to cut the ellipse into two, and use the ARRAYPATH on each of the side, that is it.

We would like to let you fight with it and figure it out yourself, using information we provided above.

Feel free to drop your opinion and concern in the comment section below.

Categories
Articles Learning

Introduction To Auto desk AutoCAD | DAY 6

Learn AutoCAD basics: DAY 6

In this session we will be challenging ourselves to learn how to play with the ARRAY command in AutoCAD.

The image below is one of those that may best serve this purpose. It is to be noted that all slots are equally spaced around the circles.

Feel free to visit the post where we practiced and talked about the use of the ARRAY command in AutoCAD.

LEARNING AUTOCAD BASICS

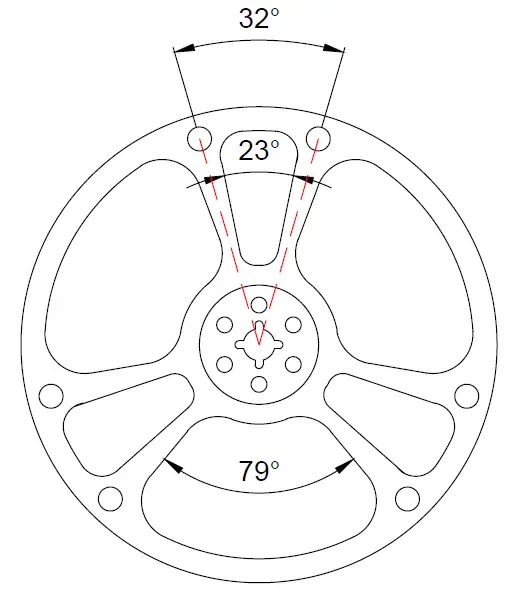
There is not much to be done in this one but the proper use of the ARRAY command. All you will need is to have mastered the TRIM command, the LINE command, the FILLET command and theCIRCLE command.

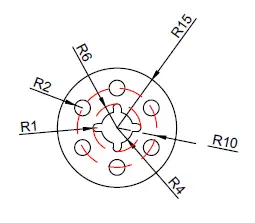
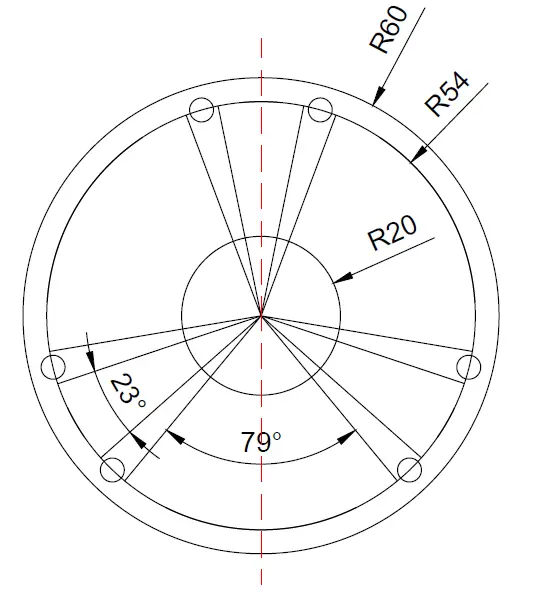
Below we have split annotations in different figures to avoid having a bushy image. Combine all information available on the figures if you want to accurately replicate today’s exercise.

FIGURE 1

learn-AutoCAD

FIGURE 2

learn-AutoCAD

FIGURE 3

Piece in the center of the exercise.

learn-AutoCAD

EXECUTION

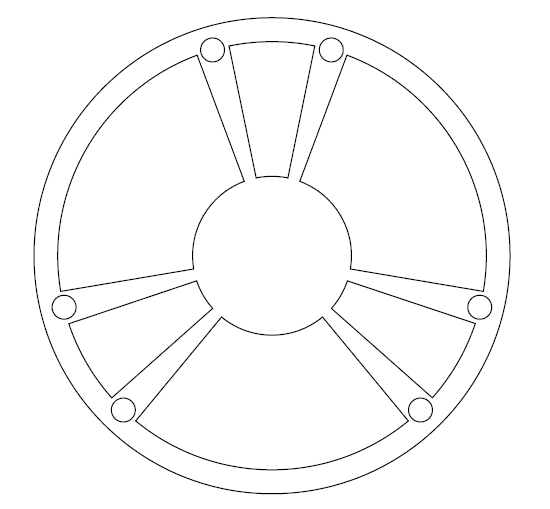
The following image might be helpful to you to have a good start

learn-AutoCAD

After proper TRIMMING, you will be left with the following

learn-AutoCAD

Now all you need to do is to use the FILLET command to round edges and create objects that are in the center of the figure.

Categories
Articles Learning

Introduction To Auto desk AutoCAD | DAY 4

Learn AutoCAD basics: DAY 4

The following should have nothing new to you if you have been here since the beginning. In this session, we are going to make good use of what we have learned so far.

The image below will serve as today task.

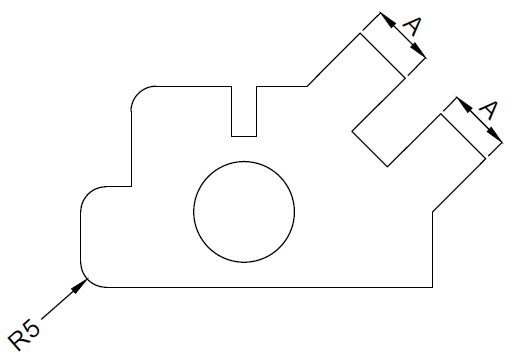
All Fillet in the following exercise are 5 units. (Learn more about the FILLET command in AutoCAD)

learn-AutoCAD

LEARNING AUTOCAD BASICS

You do not need to know the dimension of A to be able to accurately replicate the exercise. But it is crucial to know that the value of those lines are the same, that is the reason we called it A.

As I said earlier, all FILLET are R=5. We have 3 FILLET in the following exercise.

learn-AutoCAD

You will need to use the UCS command to place the circle at its appropriate distance using the same technique we used in the last session.

The following information will also be important to know.

learn-AutoCAD

Basically, there is nothing added than the FILLET command here. Ignore the FILLET, complete the figure and you can get those FILLET done at the end of the task.

Feel free to drop your thoughts below in case of any question or pinion.

Categories
Articles Learning

Introduction To Auto desk AutoCAD | DAY 1

Learn AutoCAD basics: DAY 1

Welcome to Learn AutoCAD 2D basics in 21 DAYS!

Here is the first DAY. We will on this journey make use of all basic commands in AutoCAD.

The  Attempt: Handing you enough skills that you give you confidence to continue learning auto-didactically.


LEARNING AUTOCAD BASICS

Today we will start from what you need to know on Day 1. You need to have visited theseAutoCAD tutorial before diving into the following. (Jump this step and read further down, if you feel that you can handle the rest of the content without needing anything else, feel free to do so).

COORDINATE SYSTEM

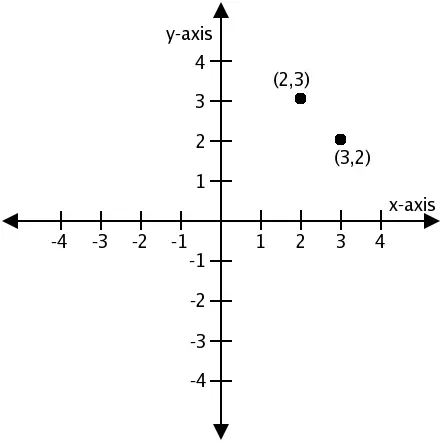
In AutoCAD, the Drawing Area is composed by a sheet in which every location has the particularity of having its own coordinate represented by x, y and z.

Learn-AutoCAD

Since we are going to be solely working in 2D in this series, we can forget about the z component of the coordinate system.

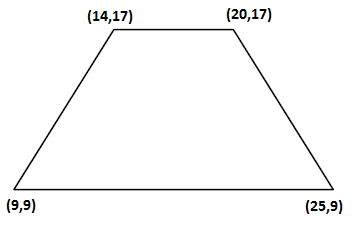
Looking at the following image, you will notice that each corner of the figure has a coordinates.

Learn-AutoCAD

Though it is true you wont be using this a lot while drawing in AutoCAD, we will spend a minute talking about it. At this point, I will suggest you disable the Dynamic input before trying the following.

We will try creating the previous image using the coordinate system and the command window. It is simple, the concept will be to use the four points to draw the quadrilateral.

To do that using autoCAD:

1. Type LINE and Press Enter
2. Type 9,9 and Press Enter
3. Type 25,9 and Press Enter
4. Type 20,17 Press Enter
5. Type 14,17 Press Enter
6. Type 9,9 And Press Enter
7. Press Esc

The first step allows to activate the LINE command. (Learn more about the LINE command)

The second step allows to specify the starting point of the line and the same goes for next steps.

The last Step allows to Cancel the LINE command.

In AutoCAD stroking Esc (ESCAPE) allows to exit a command.

At this stage, you are not using the computer mouse, and you are require to pay close attention to the command windows while drawing. As we go, we will learn more about the command windows and how to use your mouse in AutoCAD.

EXERCISE

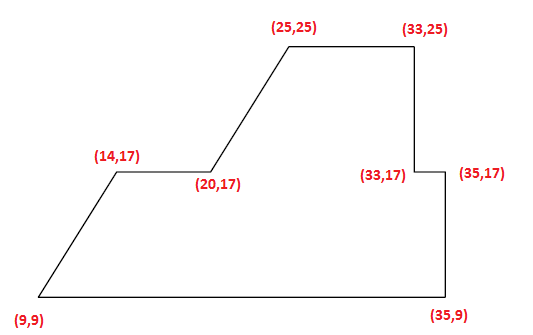
Use the technique we have just learned to create the following.

learn-AutoCAD

Note you can start from any point.