Lets Chat
We would love to hear from you and see how we can help 🙂
-
Call Us On
-
Come Find Us At
#150 D Park View -Gulan St.-Erbil-Iraq
-
Email Us At


 Cool 3D flying wing model in 3ds Max
Introduction to 3ds Max for beginners:
This awesome piece of software consists of 3D modeling design, realistic animation, and renders of 3D models. There is a free 3ds max trial version to try out (See the 3ds Max download below). You can purchase the software at the link below. Also, students get to
Introduction to and history of Autodesk 3ds Max
Developed and produced by Autodesk Media and Entertainment, Autodesk 3ds Max is software for rendering 3D animation, models and imagery. It was originally called 3D Studio and was created by the Yost Group of Atari for work on the DOS platform, and development started in 1988. It later was adopted for Windows NT with 3D Studio DOS release 4 and was subsequently renamed 3D Studio MAX. 3D studio MAX, also developed by the Yost group was produced by Kinetix, which was then the media and entertainment division of Autodesk. It was the release 8 of the original 3D Studio, which was renamed Autodesk 3ds Max which was made available to the public in 2009. 3ds Max offers much functionality targeted towards ease of use and faster image and animation rendition.
The software is used in developing CGI as well as applications ranging from academia to game development. Each use of the software requires the use of a different set of tools available in the software and as plug-ins. 3ds Max is available free of cost for students. However profession packs are available for sale.
Autodesk 3ds Max is primarily, although not completely, based on polygon modeling. Polygon modeling is used more extensively in game design than in other animation application as it offers a highly specific control over individual polygons that make up the model. This feature of polygon modeling also allow for greater optimization of the model.
Usually, the design process begins at the selection of a primitive model bundled with 3ds, which is then further refined as per need. The current versions have a simplified mesh editing interface and using the ‘edit poly’ modifier which moves the tools available in the primitive model, higher in the modifier stack, allowing them to be used on top of other modifications.
In the 3ds Max software various unique primitive shapes such as teapots, cones, pyramids and cubes are available which can be used as a base for model development.
Although polygons are the method of choice for model building, surfaces are easier to define using other methods. 3ds Max’s subdivision surface support allows for smoothened surfaces and with the use of tools like Soft Selection, which allows manipulation of vertex clouds into the desired shape without distortions from unwanted shapes and displaying smooth surfaces. The sculpting brush feature allows smooth surfaces to be drawn by hand, if polygons give a distorted image, although functionality is limited.
The NURBs feature of Autodesk 3ds allows smooth surface rendition by use of mathematical formulae and is of greatest use to in accurate simulation of mechanical parts. This is of greatest use in applications such as automobile design and instrument design.
3ds Max allows the use of custom lighting and shadows and highlights can also be ‘burned’ into the image rendered. These settings are mostly used for game imagery, since pre-fit values of shadows and highlights allows the game engine to process less data thereby improving game speed and performance as the model is already painted with the required modifications.
This also means that for constant lighting conditions during play, especially if motion is involved, the images do not falter and give a constant, regular image, free of improper shadows and bad graphics.
For life like character models, 3ds Max includes simulation for hair, skin, cloth and fur, all requirements for simulation of living beings. These inbuilt add-ons reduce the time required for model development and improve the detail for each frame.
It also includes rigid body dynamics which means that simulation of hard bodies such as wood or bricks, is easy to perform. This software is also equipped with features like shatter effect to recreate the dynamics of shattering rigid objects. However, soft body dynamics, which allows for the motion simulation of deformable objects, is not supported by 3ds Max, which makes simulation of such objects difficult.
A very useful feature of this software is the support for Inverse Kinematics and Forward Kinematics. Inverse Kinematics or skeleton modeling allows the user to create a model and fit it with a skeleton, which can then be animated as per the requirements of the animator. This skeleton can then be placed inside the model, making the animating the model easier.
* MAXScript: It is a scripting language which is built into the software and can automate repetitive tasks, give varying combinations of present features and developing tools and user interfaces. MAXScript can also be used to build plug-ins for 3ds Max.
* Scene Explorer: Scene Explorer provides an orderly, hierarchical view of scene data. It allows categorical editing of data, to achieve simplicity in editing complex sets and can also manage code in .NET.
* Character Studio: Initially a plug-in character studio is a tool for help in animating virtual characters, the Character Studio allows using stock skeleton animation to quickly and easily modify characters for a project which work on the ‘biped’ skeletal system.
* General keyframing: There are two keying modes; auto key and set key which provide support for separate workflows. The keyframing controls given help in easing the animation by providing simple, but important features like cut, copy and paste.
* Constrained animation: It allows animation of objects placed inside the constraints of their shape. This tool allows the animation of objects along curves with controls provided for smoothness, velocity, alignment, banking etc. and along surfaces.
* Skinning: Using with the Physique or Skin, a fine control of movement can be achieved and can be used in the most tricky of places.
* Integration with Autodesk Vault plug-in: The Autodesk Vault is a plug-in which is shipped along with 3ds Max and is used to integrate user data and assets on to one location, thus tracking progress on projects. Also, managing work in progress is an easier task. The plug-in enables users to safely and easily design, find, reuse and share 3ds Max models for a team production effort.
All in all, Autodesk 3ds Max is a useful software for learning and practicing animation and developing the skills required for 3D modeling and animation purposes. Along with having a very user friendly interface, it also can be used for managing professional projects in animation. One of the best features is added plug-in functionality which increases its features by a wide margin.


Following our readers poll last year, here’s an updated list of what we think are the best ten apps for architects. From condensed versions of large scale programmes architects and designers use every day, to blank canvases to scratch ideas down onto, you might just find an app that could improve the way you work.
#10 Photosynth (iOS/Windows)
If you’ve ever been on a site, or in an interesting location, and are bored of flat panoramas then this app holds the answer. It’s user friendly and, once you’ve stood in one position and circled for a while, it stitches a collection of photos together and gives you a great 360degree panorama.
#9 AutoCAD 360, formerly AutoCAD WS (iOS/Android)
Get all your CAD plans on a mobile device. It’s simple and easy to use. They do require a ‘Pro’ subscription for some features.
#8 iRhino 3D (iOS)

Using this app you can view any Rhine 3DM file on your mobile device. It’s a great way of showcasing your models.
#7 Autodesk Formit (iOS/Android)
As a subsidiary of Autodesk Revit, this app allows you to create and alter BIM models on mobile devices.
#6 Morpholio / Morpholio Trace (iOS)

The Morpholio Project is really interesting and offers an insight into where skilled app designers can go with a good idea. Trace is an architect’s best friend and they offer an app that does just that – you can read an ArchDaily review of it here.
#5 Adobe Ideas (iOS)

This app gives a few tools to jot down ideas quickly and efficiently. It doesn’t provide as many export options as our #4, but does work well on both iPhone and iPad.
#4 Sketchbook (iOS)
This app (designed by Autodesk) offers you sketching freedom coupled with useful ways of exporting drawings on different canvas sizes and at different resolutions. It might feel as user friendly as our #1 app choice, but it’s certainly useful.
#3 Graphisoft BIMx (iOS)
Introducing Hyper-models – Graphisoft’s term for describing BIM on mobile devices – has the potential to make BIM even more popular. As an app that can be used by every member of a project’s design and construction teams, it’s worth checking out.
#2 MagicPlan (iOS/Android)
MagicPlan is, well, magic. It takes advantage of the devices camera and augmented reality to create floor plans of rooms. All you have to do is stand and point your device and it does the rest of the work. You can then export these drawings as a PDF, JPG, or DXF. It takes a bit of getting used to at first but, once mastered, is quite accurate.
#1 Paper (iOS)
With five tools and a blank canvas, coupled with as many virtual sketchbooks as you want, Paper is one of the most loved mobile sketching apps. Having won Apple’s App of the Year and been given the 2012 Apple Design Award, the app has also been extensively reviewed by The Verge. It’s fast, easy, and responsive.

Welcome to Learn AutoCAD 2D basics in 21 DAYS!
Here is the first DAY. We will on this journey make use of all basic commands in AutoCAD.
The Attempt: Handing you enough skills that you give you confidence to continue learning auto-didactically.
Today we will start from what you need to know on Day 1. You need to have visited theseAutoCAD tutorial before diving into the following. (Jump this step and read further down, if you feel that you can handle the rest of the content without needing anything else, feel free to do so).
In AutoCAD, the Drawing Area is composed by a sheet in which every location has the particularity of having its own coordinate represented by x, y and z.
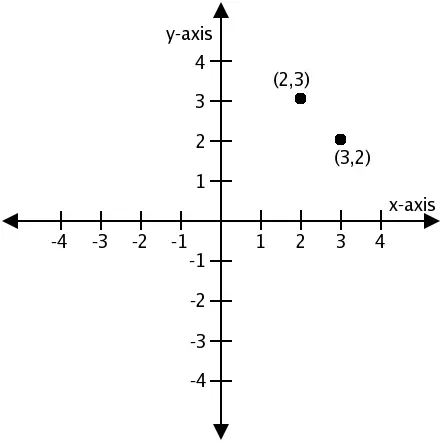
Since we are going to be solely working in 2D in this series, we can forget about the z component of the coordinate system.
Looking at the following image, you will notice that each corner of the figure has a coordinates.
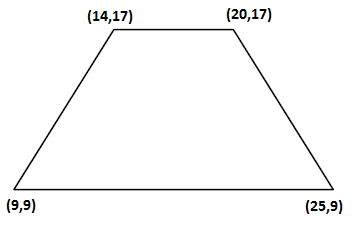
Though it is true you wont be using this a lot while drawing in AutoCAD, we will spend a minute talking about it. At this point, I will suggest you disable the Dynamic input before trying the following.
We will try creating the previous image using the coordinate system and the command window. It is simple, the concept will be to use the four points to draw the quadrilateral.
To do that using autoCAD:
The first step allows to activate the LINE command. (Learn more about the LINE command)
The second step allows to specify the starting point of the line and the same goes for next steps.
The last Step allows to Cancel the LINE command.
In AutoCAD stroking Esc (ESCAPE) allows to exit a command.
At this stage, you are not using the computer mouse, and you are require to pay close attention to the command windows while drawing. As we go, we will learn more about the command windows and how to use your mouse in AutoCAD.
Use the technique we have just learned to create the following.
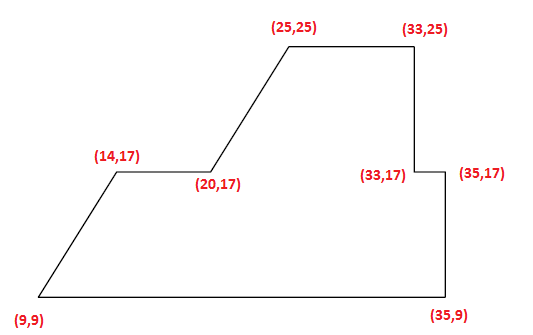
Note you can start from any point.