Graphic World

Categories
Learning Post

The 5 best new 3D tools for June 2017

We’re alreay halfway through the year and developments in the world of 3D artdon’t show signs of slowing down any time soon. With plenty of tools and updates hitting the scene, let’s dive in with the top 5 tools for June.

1. Laubwerks

Laubwerks are touted as the best foliage kits in the business

If you’re into architectural visualisation or environment work then it’s very likely that you will need foliage of some kind. Over the last few years Laubwerk have produced some of the best quality foliage packs around.

What makes them special is not just the excellent models and accompanying textures but the implementation. Not only doe they ship plugins for various host apps but the Laubwerk player also lets you dial in attributes for your plants, from age of plant to the season, with materials and meshes responding appropriately.

Now, Laubwerk have released their first shrub pack, as well as a new Maya player, bringing these top quality kits to an even bigger user  base.

2. Modo 10.1

10.1 adds a large feature list to the previous release and will please modelers

Not that long ago the foundry announced their new model for development of modo and now we are seeing the results of the second edition in this series, 10.1.

10.1 is solidly focused on modelling and brings to the table far more than can be talked about here but the highlights are some huge additions and improvments to MeshFusion, the versatile Boolean system.  With similarities to Zbrush’s shadowbox it allows the user to create Booleans from different angles, making complex shapes far easier than traditional methods.

Also a big new feature, and one that joines forces with other areas of modo, is the procedural modelling system,. With many uses it’s hard to describe fully here but see it as a way of creating and editing models non destructively, with operators able to be freely moved, adjusted and animated.

10.1 is a big release so head to the product page to read more and see some of the demo videos.

3. Guide to GPU rendering

In depth guide to rendering on the GPU is free to all registrants

The battle for rendering supremacy is raging away, with both GPU and CPU camps having good points to make. However understanding the benefits of one system over another is not always that simple but Chaos Group Labs have come to the rescue, with this in depth and best of all, free guide on how working with a GPU can make your life as a cg artist easier, or at least quicker.

Of course there’s a slant towards V-Ray but that is in some ways irrelevant. The pros and cons are the same and the authors have put together a really comprehensive guide, covering everything from compute power background and history to what the future could hold.

4. Spline connect

The most efficient way of connecting spline segments is only $15

Default Cinema 4D installs don’t provide a way of easily connecting spline objects but Mike Udin, has the answer. His new Fast Spline Connect plugin, available from cgtools, makes it about as simple as any command can be.

At just $15 it’s impossible to resist if you ever work with splines and should really be a part of the standard feature set. Seeing as Cinema 4D has such a large user base we can certainly see this being a popular plugin.

5. Autodesk Industry collections

Autodesk’s new collection is a rent only affair, although cheaper than pervious iterations

If you are a fan of Autodesk software but your budget prohibited signing up tho their subscription service there’s some good news. The big ‘A’ have reshuffled their software suites into ne ‘industry collections’, which contain the same core products as before, although obviously not softimage, and they come out at a fairly substantial reduction in yearly cost (around $300 depending on your choices).

On top of this the new collections also sign you up to a new cloud service, for rendering, storage and other tools like the character builder.

There will no longer be the option to buy a perpetual license however, so if you really need to use the software plan ahead.

Categories
Download Plugins

Nextlimit Maxwell Render Bundle with PlugIns (10.6.2015) (Win/Mac/Linux)

Nextlimit Maxwell Render Bundle with PlugIns (10.6.2015) (Win/Mac/Linux) | 3.14GB

Info

Info:
Maxwell Render Nextlimit company is an independent system of visualization (rendering) of three-dimensional objects, which is based on the principle of “no assumptions”. That is, it is based on the physical properties of light and surfaces. Since the program uses the equation of the wave theory of light, it is possible to visualize three-dimensional scenes with unprecedented quality.
Download

Uploaded

http://uploaded.net/file/c7wjbxpk/NextLimit.Maxwell.Render.for.3ds.Max.v3.2.4-AMPED.rar
http://uploaded.net/file/ngv91r0t/NextLimit.Maxwell.Render.for.AE.v3.2.0.MACOSX-AMPED.rar
http://uploaded.net/file/09upmm5c/NextLimit.Maxwell.Render.for.AE.v3.2.0-AMPED.rar
http://uploaded.net/file/qhzanrlc/NextLimit.Maxwell.Render.for.ArchiCAD.v3.2.0.MACOSX-AMPED.rar
http://uploaded.net/file/4kucyfy9/NextLimit.Maxwell.Render.for.ArchiCAD.v3.2.0-AMPED.rar
http://uploaded.net/file/1ewl7ajj/NextLimit.Maxwell.Render.for.Bonzai3D.v3.2.0.4-AMPED.rar
http://uploaded.net/file/spuqpe1g/NextLimit.Maxwell.Render.for.Cinema4D.R11.5.v3.2.0-AMPED.rar
http://uploaded.net/file/adu9l0e9/NextLimit.Maxwell.Render.for.Cinema4D.R12-R13.v3.2.0-AMPED.rar
http://uploaded.net/file/kc4nqr2k/NextLimit.Maxwell.Render.for.Cinema4D.R9.6-R11.v3.2.0-AMPED.rar
http://uploaded.net/file/tm2l5xxs/NextLimit.Maxwell.Render.for.form.Z.7.v3.2.0-AMPED.rar
http://uploaded.net/file/1uobavvd/NextLimit.Maxwell.Render.for.form.Z.8.v3.2.0-AMPED.rar
http://uploaded.net/file/kggdq0z6/NextLimit.Maxwell.Render.for.Houdini.v3.2.0.0-AMPED.rar
http://uploaded.net/file/ybmruipl/NextLimit.Maxwell.Render.for.Houdini.v3.2.0.LINUX.X64-AMPED.rar
http://uploaded.net/file/eqmy6eu0/NextLimit.Maxwell.Render.for.Houdini.v3.2.0.MACOSX.REPACK-AMPED.rar
http://uploaded.net/file/74j0xc14/NextLimit.Maxwell.Render.for.Houdini.v3.2.0.MACOSX-AMPED.rar
http://uploaded.net/file/2uo9juq2/NextLimit.Maxwell.Render.for.LightWave.v3.2.0.MACOSX-AMPED.rar
http://uploaded.net/file/dtetizyq/NextLimit.Maxwell.Render.for.LightWave.v3.2.0-AMPED.rar
http://uploaded.net/file/tmvipl3n/NextLimit.Maxwell.Render.for.Maya.v3.2.7.LINUX-AMPED.rar
http://uploaded.net/file/0r6odixr/NextLimit.Maxwell.Render.for.Maya.v3.2.7.MACOSX-AMPED.rar
http://uploaded.net/file/vc1wkaij/NextLimit.Maxwell.Render.for.Maya.v3.2.7-AMPED.rar
http://uploaded.net/file/fwgx1u0q/NextLimit.Maxwell.Render.for.Modo.v3.2.MACOSX-AMPED.rar
http://uploaded.net/file/aktnucbq/NextLimit.Maxwell.Render.for.Modo.v3.2-AMPED.rar
http://uploaded.net/file/cw1ht5mo/NextLimit.Maxwell.Render.for.NUKE.v3.2.0.LINUX-AMPED.rar
http://uploaded.net/file/bq9tuilw/NextLimit.Maxwell.Render.for.NUKE.v3.2.0.MACOSX-AMPED.rar
http://uploaded.net/file/lcis45c7/NextLimit.Maxwell.Render.for.NUKE.v3.2.0-AMPED.rar
http://uploaded.net/file/ocvtbv3z/NextLimit.Maxwell.Render.for.Photoshop.v3.2.0.MACOSX-AMPED.rar
http://uploaded.net/file/leszlc71/NextLimit.Maxwell.Render.for.Photoshop.v3.2.0-AMPED.rar
http://uploaded.net/file/bqdaks4l/NextLimit.Maxwell.Render.for.Revit.v3.2.0-AMPED.rar
http://uploaded.net/file/kbiudja2/NextLimit.Maxwell.Render.for.Rhinoceros.v3.2.0.X64-AMPED.rar
http://uploaded.net/file/jgl4lztc/NextLimit.Maxwell.Render.for.Rhinoceros.v3.2.0-AMPED.rar
http://uploaded.net/file/t5kr1868/NextLimit.Maxwell.Render.for.SketchUp.v3.2.0.MACOSX-AMPED.rar
http://uploaded.net/file/u8tzf60o/NextLimit.Maxwell.Render.for.SketchUp.v3.2.0-AMPED.rar
http://uploaded.net/file/moqbc5lx/NextLimit.Maxwell.Render.for.SolidWorks.v3.2.0.X64-AMPED.rar
http://uploaded.net/file/jfqroqpg/NextLimit.Maxwell.Render.for.SolidWorks.v3.2.0-AMPED.rar
http://uploaded.net/file/iaz34wze/NextLimit.Maxwell.Render.for.XSI.v3.2.0-AMPED.rar
http://uploaded.net/file/mjmu2tvd/NextLimit.Maxwell.Render.v3.2.0.0.LINUX-AMPED.rar
http://uploaded.net/file/31es8n96/NextLimit.Maxwell.Render.v3.2.0.MACOSX-AMPED.rar
http://uploaded.net/file/xp17nzdh/NextLimit.Maxwell.Render.v3.2.0.X64-AMPED.rar
http://uploaded.net/file/th7bzffk/NextLimit.Maxwell.Render.v3.2.0-AMPED.rar
fixed:
http://uploaded.net/file/u8wmbbqt/NextLimit.Maxwell.Render.for.Cinema4D.R14-R17.v3.2.0-AMPED.rar
http://uploaded.net/file/jlay35c8/NextLimit.Maxwell.Render.for.Photoshop.v3.2.0.MACOSX.REPACK-AMPED.rar
http://uploaded.net/file/vvyitbkh/NextLimit.Maxwell.Render.for.Photoshop.v3.2.0.REPACK-AMPED.rar
http://uploaded.net/file/9of7ytz5/NextLimit.Maxwell.Render.v3.2.0.X64.REPACK-AMPED.rar

Rapidgator

http://rapidgator.net/file/7734a708618e91bd71a24dec82a75d53/NextLimit.Maxwell.Render.for.3ds.Max.v3.2.4-AMPED.rar.html
http://rapidgator.net/file/90c74bd8bf792441409305383976bb59/NextLimit.Maxwell.Render.for.AE.v3.2.0.MACOSX-AMPED.rar.html
http://rapidgator.net/file/603ea47655a4d10af18913858b8d3e3e/NextLimit.Maxwell.Render.for.AE.v3.2.0-AMPED.rar.html
http://rapidgator.net/file/5759a61d11fb7ca411a82267a2c62f1a/NextLimit.Maxwell.Render.for.ArchiCAD.v3.2.0.MACOSX-AMPED.rar.html
http://rapidgator.net/file/11d8d3a2e3040d227ad731cdb5309377/NextLimit.Maxwell.Render.for.ArchiCAD.v3.2.0-AMPED.rar.html
http://rapidgator.net/file/44096571d3019a0b11a3312ba774431e/NextLimit.Maxwell.Render.for.Bonzai3D.v3.2.0.4-AMPED.rar.html
http://rapidgator.net/file/1274614c05f46042a8db6f7b20691936/NextLimit.Maxwell.Render.for.NUKE.v3.2.0.MACOSX-AMPED.rar.html
http://rapidgator.net/file/738695b926ce98ef88e4a43bf339f1ff/NextLimit.Maxwell.Render.for.Cinema4D.R11.5.v3.2.0-AMPED.rar.html
http://rapidgator.net/file/fbd616f05c17c890ed33abbc3e4539e2/NextLimit.Maxwell.Render.for.Cinema4D.R12-R13.v3.2.0-AMPED.rar.html
http://rapidgator.net/file/72ef1f6825f240017b9fbffb2fb8d5ae/NextLimit.Maxwell.Render.for.Cinema4D.R9.6-R11.v3.2.0-AMPED.rar.html
http://rapidgator.net/file/fdc49173310f29c1ffceede685998efc/NextLimit.Maxwell.Render.for.form.Z.7.v3.2.0-AMPED.rar.html
http://rapidgator.net/file/e33597aaf7aa126eccf89f73db353a32/NextLimit.Maxwell.Render.for.form.Z.8.v3.2.0-AMPED.rar.html
http://rapidgator.net/file/b20c35a04b6f9a1d1139369eb63458cc/NextLimit.Maxwell.Render.for.Houdini.v3.2.0.0-AMPED.rar.html
http://rapidgator.net/file/593429c6c97f4a2f3c10a4f0d42ffa9c/NextLimit.Maxwell.Render.for.Houdini.v3.2.0.LINUX.X64-AMPED.rar.html
http://rapidgator.net/file/aea26125e58042b3eb052c4b92957599/NextLimit.Maxwell.Render.for.Houdini.v3.2.0.MACOSX.REPACK-AMPED.rar.html
http://rapidgator.net/file/3b1c9e3c7e71a6b516fd1594f0e86614/NextLimit.Maxwell.Render.for.Houdini.v3.2.0.MACOSX-AMPED.rar.html
http://rapidgator.net/file/25910971fd1fc25cd30e0bfefe75b409/NextLimit.Maxwell.Render.for.LightWave.v3.2.0.MACOSX-AMPED.rar.html
http://rapidgator.net/file/42cbfe5338f576734e5448f3281513d4/NextLimit.Maxwell.Render.for.LightWave.v3.2.0-AMPED.rar.html
http://rapidgator.net/file/3387c1730dee1d2feb0a4fb29d1f93ad/NextLimit.Maxwell.Render.for.Maya.v3.2.7.LINUX-AMPED.rar.html
http://rapidgator.net/file/82b97d1b91d4ddf5cb839a76384ee801/NextLimit.Maxwell.Render.for.Maya.v3.2.7.MACOSX-AMPED.rar.html
http://rapidgator.net/file/aed7951176c285048992d6c564165e40/NextLimit.Maxwell.Render.for.Maya.v3.2.7-AMPED.rar.html
http://rapidgator.net/file/011af0e1a55fdae9eaa8744e9f7bf2f3/NextLimit.Maxwell.Render.for.Modo.v3.2.MACOSX-AMPED.rar.html
http://rapidgator.net/file/365a7f24aadad658b3c9e734926d6d8e/NextLimit.Maxwell.Render.for.Modo.v3.2-AMPED.rar.html
http://rapidgator.net/file/87944267a8a2f5a734caa0df549d0623/NextLimit.Maxwell.Render.for.NUKE.v3.2.0.LINUX-AMPED.rar.html
http://rapidgator.net/file/fc0fefb8258b52a14e3e134275137a8a/NextLimit.Maxwell.Render.for.NUKE.v3.2.0-AMPED.rar.html
http://rapidgator.net/file/0e8f57f183e9673946c73c6fa56197da/NextLimit.Maxwell.Render.for.Photoshop.v3.2.0.MACOSX-AMPED.rar.html
http://rapidgator.net/file/c0fd271058e0556b76f0936ce024aad8/NextLimit.Maxwell.Render.for.Photoshop.v3.2.0-AMPED.rar.html
http://rapidgator.net/file/01bb532f790c5ecc6b24fb222240bffc/NextLimit.Maxwell.Render.for.Revit.v3.2.0-AMPED.rar.html
http://rapidgator.net/file/601794d9f6a7003cb86951a57f225f03/NextLimit.Maxwell.Render.for.Rhinoceros.v3.2.0.X64-AMPED.rar.html
http://rapidgator.net/file/62ca97695f62790c0250c31bd5e7c1eb/NextLimit.Maxwell.Render.for.Rhinoceros.v3.2.0-AMPED.rar.html
http://rapidgator.net/file/20c6ffe6a6f7f9e42cb711a61e1e7ebb/NextLimit.Maxwell.Render.for.SketchUp.v3.2.0.MACOSX-AMPED.rar.html
http://rapidgator.net/file/468374c75211c5f9e8960ff5e1c4bfa0/NextLimit.Maxwell.Render.for.SketchUp.v3.2.0-AMPED.rar.html
http://rapidgator.net/file/87d523d7c8f8f5ec8a6e1d990820fc67/NextLimit.Maxwell.Render.for.SolidWorks.v3.2.0.X64-AMPED.rar.html
http://rapidgator.net/file/6fe238b239840b036686219cbe6d36f0/NextLimit.Maxwell.Render.for.SolidWorks.v3.2.0-AMPED.rar.html
http://rapidgator.net/file/b09bc8d9f233413385796983021eaaa4/NextLimit.Maxwell.Render.for.XSI.v3.2.0-AMPED.rar.html
http://rapidgator.net/file/f3c5c0d5489848e0487583ed2cd9a03e/NextLimit.Maxwell.Render.v3.2.0.0.LINUX-AMPED.rar.html
http://rapidgator.net/file/bded6cf22b2d4eb1cf34de408e8c4a49/NextLimit.Maxwell.Render.v3.2.0.MACOSX-AMPED.rar.html
http://rapidgator.net/file/882f7e3dcb665168094f4e42b1680ede/NextLimit.Maxwell.Render.v3.2.0.X64-AMPED.rar.html
http://rapidgator.net/file/053277e2c61a67022862ebaf89959168/NextLimit.Maxwell.Render.v3.2.0-AMPED.rar.html
fixed:
http://rapidgator.net/file/1c01b980003e3dff4a4e1b8e113a6577/NextLimit.Maxwell.Render.for.Cinema4D.R14-R17.v3.2.0-AMPED.rar.html
http://rapidgator.net/file/26fc3feacd3854b761e29c7aa7cf150d/NextLimit.Maxwell.Render.for.Photoshop.v3.2.0.MACOSX.REPACK-AMPED.rar.html
http://rapidgator.net/file/a749e7a0fcfa55a3c3a9f4a26667578e/NextLimit.Maxwell.Render.for.Photoshop.v3.2.0.REPACK-AMPED.rar.html
http://rapidgator.net/file/5d5f3f88c112f5c8d1e75c72faa8dd97/NextLimit.Maxwell.Render.v3.2.0.X64.REPACK-AMPED.rar.html

Nitroflare

http://www.nitroflare.com/view/0F18CA42E05BB02/NextLimit.Maxwell.Render.for.Cinema4D.R14-R17.v3.2.0-AMPED.rar
http://nitroflare.com/view/B54823FCACFB5E8/NextLimit.Maxwell.Render.for.SolidWorks.v3.2.0.X64-AMPED.rar
http://nitroflare.com/view/6E9C63ADCE95153/NextLimit.Maxwell.Render.for.XSI.v3.2.0-AMPED.rar
http://nitroflare.com/view/CE53C15FA133101/NextLimit.Maxwell.Render.for.Houdini.v3.2.0.MACOSX.REPACK-AMPED.rar
http://nitroflare.com/view/49F609334DE7FB1/NextLimit.Maxwell.Render.for.SolidWorks.v3.2.0-AMPED.rar
http://nitroflare.com/view/989DEE2ECE8F297/NextLimit.Maxwell.Render.for.SketchUp.v3.2.0.MACOSX-AMPED.rar
http://nitroflare.com/view/0C37791833BE2A0/NextLimit.Maxwell.Render.for.Rhinoceros.v3.2.0.X64-AMPED.rar
http://nitroflare.com/view/4F10F5D8F8CAB96/NextLimit.Maxwell.Render.for.Photoshop.v3.2.0.MACOSX-AMPED.rar
http://nitroflare.com/view/863A1403F4D8A20/NextLimit.Maxwell.Render.for.Revit.v3.2.0-AMPED.rar
http://nitroflare.com/view/25E13DBB94EA264/NextLimit.Maxwell.Render.for.SketchUp.v3.2.0-AMPED.rar
http://nitroflare.com/view/4077B5B2752F0E0/NextLimit.Maxwell.Render.for.Rhinoceros.v3.2.0-AMPED.rar
http://nitroflare.com/view/092F3910BCA1C2A/NextLimit.Maxwell.Render.for.NUKE.v3.2.0.MACOSX-AMPED.rar
http://nitroflare.com/view/027EF918CABC929/NextLimit.Maxwell.Render.for.Photoshop.v3.2.0-AMPED.rar
http://nitroflare.com/view/9AF1459F091357A/NextLimit.Maxwell.Render.for.NUKE.v3.2.0.LINUX-AMPED.rar
http://nitroflare.com/view/51DAE338ABB7E96/NextLimit.Maxwell.Render.for.Maya.v3.2.7.MACOSX-AMPED.rar
http://nitroflare.com/view/388589474B9318B/NextLimit.Maxwell.Render.v3.2.0.MACOSX-AMPED.rar
http://nitroflare.com/view/2A9B07626B83EA5/NextLimit.Maxwell.Render.for.NUKE.v3.2.0-AMPED.rar
http://nitroflare.com/view/F9EA6473296EA7F/NextLimit.Maxwell.Render.for.Modo.v3.2-AMPED.rar
http://nitroflare.com/view/C1438C42605B225/NextLimit.Maxwell.Render.v3.2.0.0.LINUX-AMPED.rar
http://nitroflare.com/view/8391D3038DFE5B4/NextLimit.Maxwell.Render.for.LightWave.v3.2.0.MACOSX-AMPED.rar
http://nitroflare.com/view/E22956A0DE856A4/NextLimit.Maxwell.Render.for.Maya.v3.2.7-AMPED.rar
http://nitroflare.com/view/1EAC2E6D0305C35/NextLimit.Maxwell.Render.for.Modo.v3.2.MACOSX-AMPED.rar
http://nitroflare.com/view/1A2B636897C2858/NextLimit.Maxwell.Render.for.LightWave.v3.2.0-AMPED.rar
http://nitroflare.com/view/C07683E8ABA1B2A/NextLimit.Maxwell.Render.for.Maya.v3.2.7.LINUX-AMPED.rar
http://nitroflare.com/view/40C12AC9D0E5516/NextLimit.Maxwell.Render.for.AE.v3.2.0.MACOSX-AMPED.rar
http://nitroflare.com/view/3C3C87095328753/NextLimit.Maxwell.Render.for.AE.v3.2.0-AMPED.rar
http://nitroflare.com/view/9B465EA6F612FCD/NextLimit.Maxwell.Render.for.ArchiCAD.v3.2.0.MACOSX-AMPED.rar
http://nitroflare.com/view/B7504C36AF7B73F/NextLimit.Maxwell.Render.for.ArchiCAD.v3.2.0-AMPED.rar
http://nitroflare.com/view/450BEA92A3C64B1/NextLimit.Maxwell.Render.for.3ds.Max.v3.2.4-AMPED.rar
http://nitroflare.com/view/7C710518EB5956C/NextLimit.Maxwell.Render.for.Bonzai3D.v3.2.0.4-AMPED.rar
http://nitroflare.com/view/C0B0747C6C2B3E1/NextLimit.Maxwell.Render.for.Cinema4D.R9.6-R11.v3.2.0-AMPED.rar
http://nitroflare.com/view/B2A27EA35257950/NextLimit.Maxwell.Render.for.Cinema4D.R11.5.v3.2.0-AMPED.rar
http://nitroflare.com/view/272A5453564707D/NextLimit.Maxwell.Render.for.Houdini.v3.2.0.0-AMPED.rar
http://nitroflare.com/view/110390BC63C66BA/NextLimit.Maxwell.Render.for.Houdini.v3.2.0.MACOSX-AMPED.rar
http://nitroflare.com/view/0520EED355B5731/NextLimit.Maxwell.Render.for.Houdini.v3.2.0.LINUX.X64-AMPED.rar
http://nitroflare.com/view/7786B659E50C5E3/NextLimit.Maxwell.Render.v3.2.0-AMPED.rar
http://nitroflare.com/view/74DE73991FA4CE0/NextLimit.Maxwell.Render.v3.2.0.X64-AMPED.rar
http://nitroflare.com/view/1B2FED82EDE22C9/NextLimit.Maxwell.Render.for.Cinema4D.R12-R13.v3.2.0-AMPED.rar
http://nitroflare.com/view/AF7EAD23B68FDAA/NextLimit.Maxwell.Render.for.form.Z.7.v3.2.0-AMPED.rar
http://nitroflare.com/view/956303C5DFC19FE/NextLimit.Maxwell.Render.for.form.Z.8.v3.2.0-AMPED.rar
fixed:
http://nitroflare.com/view/0E8C9C8FA018242/NextLimit.Maxwell.Render.for.Photoshop.v3.2.0.MACOSX.REPACK-AMPED.rar
http://nitroflare.com/view/534FD52745A1C68/NextLimit.Maxwell.Render.for.Photoshop.v3.2.0.REPACK-AMPED.rar
http://nitroflare.com/view/9D61BE981B31BAE/NextLimit.Maxwell.Render.v3.2.0.X64.REPACK-AMPED.rar
Categories
Learning Tutorials

BlobMesh Compound Object – 3D Max Tutorial

BlobMesh Compound Object

compound object creates a set of spheres from geometry or particles, and connects the spheres together as if they were made of a soft, liquid substance. When the spheres move within a certain distance of one another, they connect together. When they move apart, they take on a spherical form again.
  • Create panel > (Geometry) > Compound Objects > Object Type rollout >BlobMesh
  • Standard menu: Create menu > Compound > BlobMesh
  • Enhanced menu: Objects menu > Compound Objects > BlobMesh

In the 3D industry, the general term for spheres that operate in this way is metaballs. The BlobMesh compound object generates metaballs based on specified objects in the scene, and the metaballs, in turn, form a mesh result called a blobmesh. A blobmesh is ideal for simulating thick liquids and soft substances that move and flow when animated.

When you associate an object or particle system with the BlobMesh compound object, the metaballs are placed and sized differently depending on the object used to generate them:

  • For geometry and shapes, a metaball is placed at each vertex, and the size of each metaball is determined by the size of the original BlobMesh object. Soft selection can be used to vary the sizes of the metaballs.
  • For particles, a metaball is placed at each particle, and the size of each metaball is determined by the size of the particle on which it’s based.
  • For helpers, a metaball is placed at the pivot point, and the size of the metaball is determined by the original BlobMesh object.
Note: You can apply motion blur to a BlobMesh object to enhance the effects of motion in renderings. For particle systems other than Particle Flow, use Image motion blur. For Particle Flow particle systems and all other types of objects including geometry, shapes, and helpers, use Object motion blur.

Procedures

To create a blobmesh from geometry or helpers:

  1. Create one or more geometry or helper objects. If the scene requires animation, animate the objects as desired.
  2. Click BlobMesh, and click anywhere on the screen to create the initial metaball.
  3. Go to the Modify panel.
  4. In the Blob Objects group, click Add. Select the objects you wish to use to create metaballs. A metaball appears at each vertex of each selected object, or at the centers of helper objects.
  5. In the Parameters rollout, set the Size parameter as necessary to cause the metaballs to connect.

To create a blobmesh with soft selection on geometry:

  1. Create a geometry object, and convert it to an Editable Mesh or Editable Poly.
  2. Apply a Mesh Select modifier to the object, and select some of the vertices on the object.
  3. In the Soft Selection rollout, turn on Use Soft Selection. Set the Falloff value as desired.
  4. Apply a Turn to Mesh or Turn to Poly modifier to the object.

    This will retain the soft selection and pass it up the stack regardless of whether you exit the sub-object mode.

  5. On the Create panel, with (Geometry) active, choose Compound Objects from the drop-down list. On the Object Type rollout, turn on BlobMesh. Click anywhere in a viewport to create the initial metaball.
  6. Go to the Modify panel.
  7. In the Blob Objects group, click Add. Select the Editable Mesh or Editable Poly object.

    A metaball appears at each vertex of the selected object.

  8. In the Parameters rollout, turn on Use Soft Selection.

    Metaballs are limited to those vertices that are affected by the soft selection.

  9. Set the Size and Min. Size parameters to set the sizes of the metaballs.

To create a blobmesh with soft selection on a spline:

  1. Create the spline, and convert it to an Editable Spline.
  2. In the Rendering rollout, turn on both Enable In Renderer and Enable In Viewport.
  3. Apply a Mesh Select modifier, and select the appropriate vertices for soft selection.
  4. In the Soft Selection rollout, turn on Use Soft Selection. Set the Falloff value as desired.
  5. Apply a Turn to Mesh or Turn to Poly modifier to the object.

    This will retain the soft selection and pass it up the stack regardless of whether you exit the sub-object mode.

  6. On the Create panel, with (Geometry) active, choose Compound Objects from the drop-down list. On the Object Type rollout, turn on BlobMesh. Click anywhere in a viewport to create the initial metaball.
  7. Go to the Modify panel.
  8. In the Blob Objects group, click Add. Select the Editable Spline.

    A metaball appears at each vertex of the selected object.

  9. In the Parameters rollout, turn on Use Soft Selection.

    Metaballs are limited to those vertices that are affected by the soft selection.

  10. Set the Size and Min. Size parameters to set the sizes of the metaballs.

To create a blobmesh from a particle system:

When you use BlobMesh with a particle system, a metaball is created at each particle’s location. The size of the metaball is determined by the size of the particle.

  1. Create a particle system, and set up its parameters to animate the particles.
  2. On the Create panel, with (Geometry) active, choose Compound Objects from the drop-down list. On the Object Type rollout, turn on BlobMesh. Click anywhere in a viewport to create the initial metaball.
  3. Go to the Modify panel.
  4. In the Blob Objects group, click Add. Select the particle system. A metaball appears at each particle in the system.
  5. If you have added a Particle Flow system to the blobmesh and you want to create metaballs only for particles in specific events, click Add on the Particle Flow Parameters rollout to choose the events from a list.
    Tip: If you need to prevent the particles from rendering, do not hide them as this can prevent the blobmesh from generating correctly. Instead, turn off the particle system’s Renderable option on the Object Properties dialog.

Interface

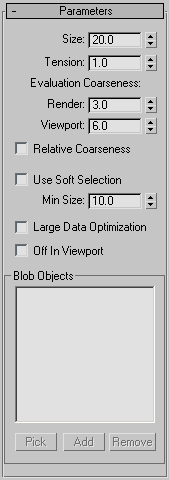
Parameters rollout

Size

The radius of each metaball for objects other than particles. For particles, the size of each metaball is determined by the size of the particle, which is set by parameters in the particle system. Default=20.

Note: The apparent size of the metaballs is affected by the Tension value. When Tension is set to its lowest possible value, the radius of each metaball accurately reflects the Size setting. Higher Tension values will tighten the surface, and make the metaballs smaller.
Tension

Determines how relaxed or tight the surface will be. A smaller value makes a looser surface. This value can range from 0.01 to 1.0. Default=1.0.

Evaluation Coarseness

Sets the coarseness, or density, of the resulting blobmesh. When Relative Coarseness (see following) is off, the Render and Viewport values set the absolute height and width of blobmesh faces, and lower values create a smoother, denser mesh. When Relative Coarseness is on, the height and width of blobmesh faces is determined by the ratio of metaball size to this value. In this case, higher values create a denser mesh. Range (both)=0.001 to 1000.0. Render default=3.0, Viewport default =6.0.

The lower end of the range for both Coarseness settings is 0.001, which allows for high-resolution metaball geometry when Relative Coarseness is off. Using such low values can also cause lengthy calculation delays; if this happens and you wish to halt calculation, press Esc.

Relative Coarseness

Determines how the coarseness values will be used. If this option is turned off, the Render Coarseness and View Coarseness values are absolute, where the height and width of each face on the blobmesh is always equal to the coarseness value. This means the faces on the blobmesh will retain a fixed size even if the metaballs change size. If this option is turned on, the size of each blobmesh face is based on the ratio of the metaball size to the coarseness, which will cause the blobmesh face size to change as the metaballs become larger or smaller. Default=Off.

Large Data Optimization

This option provides an alternate method for calculating and displaying the blobmesh. This method is more efficient than the default method only when a large number of metaballs are present, such as 2,000 or more. Turn on this option only when using a particle system or other object that produces a large number of metaballs. Default=Off.

Off in Viewport

Turns off the display of the blobmesh in viewports. The blobmesh will still appearing in renderings. Default=Off.

Use Soft Selection
If soft selection has been used on geometry you add to the blobmesh, turning on this option causes the soft selection to be used for the size and placement of metaballs. Metaballs are placed at selected vertices with the size set by the Size parameter. For vertices that lie within the falloff set on the geometry’s Soft Selection rollout, smaller metaballs are placed. For vertices outside the falloff, no metaballs are placed. This option has an effect only if the Vertex sub-object level for the geometry is still enabled, and Use Soft Selection on the geometry’s Soft Selection rollout is turned on. If Use Soft Selection is turned off either for the blobmesh for the geometry, metaballs are placed at all vertices on the geometry. Default=Off.

  • Min Size Sets the minimum size for metaballs within the falloff when Use Soft Selection is turned on. Default=10.0.
Blob Objects group
[objects list]
Lists objects in the scene that are part of the blobmesh simulation.
Pick

Allows you to pick objects or particle systems from the screen to add to the blobmesh.

Add

Displays a selection dialog where you can select objects or particle systems to add to the blobmesh.

Remove

Removes objects or particles from the blobmesh.

Particle Flow Parameters rollout

Use this rollout if you have added a Particle Flow system to the blobmesh, and want particles to generate metaballs only during specific events. Before you can specify events on this rollout, you must add the Particle Flow system to the blobmesh on the Parameters rollout.

All Particle Flow Events

When turned on, all Particle Flow Events will generate metaballs. When turned off, only Particle Flow Events specified in the PFlow Events list will generate metaballs.

Particle Flow Events group
[PFlow events list]
Lists PFlow events that are part of the blobmesh simulation.
Add

Displays a list of PFlow events in the scene so you can pick events to add to the PFlow Events list.

Remove

Removes the selected event from the PFlow Events list.

Categories
Articles Learning

WHAT IS 3DS MAX? AN INTRODUCTION …

WHAT IS 3DS MAX? AN INTRODUCTION …

Introduction to 3ds Max for beginners:

This awesome piece of software consists of 3D modeling design, realistic animation, and renders of 3D models. There is a free 3ds max trial version to try out (See the 3ds Max download below). You can purchase the software at the link below. Also, students get to


Introduction to and history of Autodesk 3ds Max

Developed and produced by Autodesk Media and Entertainment, Autodesk 3ds Max is software for rendering 3D animation, models and imagery. It was originally called 3D Studio and was created by the Yost Group of Atari for work on the DOS platform, and development started in 1988. It later was adopted for Windows NT with 3D Studio DOS release 4 and was subsequently renamed 3D Studio MAX. 3D studio MAX, also developed by the Yost group was produced by Kinetix, which was then the media and entertainment division of Autodesk. It was the release 8 of the original 3D Studio, which was renamed Autodesk 3ds Max which was made available to the public in 2009. 3ds Max offers much functionality targeted towards ease of use and faster image and animation rendition.

Major Applications of Autodesk 3ds Max

The software is used in developing CGI as well as applications ranging from academia to game development. Each use of the software requires the use of a different set of tools available in the software and as plug-ins. 3ds Max is available free of cost for students. However profession packs are available for sale.

Major Features of Autodesk 3ds Max

Autodesk 3ds Max is primarily, although not completely, based on polygon modeling. Polygon modeling is used more extensively in game design than in other animation application as it offers a highly specific control over individual polygons that make up the model. This feature of polygon modeling also allow for greater optimization of the model.

Usually, the design process begins at the selection of a primitive model bundled with 3ds, which is then further refined as per need. The current versions have a simplified mesh editing interface and using the ‘edit poly’ modifier which moves the tools available in the primitive model, higher in the modifier stack, allowing them to be used on top of other modifications.

In the 3ds Max software various unique primitive shapes such as teapots, cones, pyramids and cubes are available which can be used as a base for model development.

Although polygons are the method of choice for model building, surfaces are easier to define using other methods. 3ds Max’s subdivision surface support allows for smoothened surfaces and with the use of tools like Soft Selection, which allows manipulation of vertex clouds into the desired shape without distortions from unwanted shapes and displaying smooth surfaces. The sculpting brush feature allows smooth surfaces to be drawn by hand, if polygons give a distorted image, although functionality is limited.

The NURBs feature of Autodesk 3ds allows smooth surface rendition by use of mathematical formulae and is of greatest use to in accurate simulation of mechanical parts. This is of greatest use in applications such as automobile design and instrument design.

3ds Max allows the use of custom lighting and shadows and highlights can also be ‘burned’ into the image rendered. These settings are mostly used for game imagery, since pre-fit values of shadows and highlights allows the game engine to process less data thereby improving game speed and performance as the model is already painted with the required modifications.

This also means that for constant lighting conditions during play, especially if motion is involved, the images do not falter and give a constant, regular image, free of improper shadows and bad graphics.

For life like character models, 3ds Max includes simulation for hair, skin, cloth and fur, all requirements for simulation of living beings. These inbuilt add-ons reduce the time required for model development and improve the detail for each frame.

It also includes rigid body dynamics which means that simulation of hard bodies such as wood or bricks, is easy to perform. This software is also equipped with features like shatter effect to recreate the dynamics of shattering rigid objects. However, soft body dynamics, which allows for the motion simulation of deformable objects, is not supported by 3ds Max, which makes simulation of such objects difficult.

A very useful feature of this software is the support for Inverse Kinematics and Forward Kinematics. Inverse Kinematics or skeleton modeling allows the user to create a model and fit it with a skeleton, which can then be animated as per the requirements of the animator. This skeleton can then be placed inside the model, making the animating the model easier.


Tools available in Autodesk 3ds Max

* MAXScript: It is a scripting language which is built into the software and can automate repetitive tasks, give varying combinations of present features and developing tools and user interfaces. MAXScript can also be used to build plug-ins for 3ds Max.

* Scene Explorer: Scene Explorer provides an orderly, hierarchical view of scene data. It allows categorical editing of data, to achieve simplicity in editing complex sets and can also manage code in .NET.

* Character Studio: Initially a plug-in character studio is a tool for help in animating virtual characters, the Character Studio allows using stock skeleton animation to quickly and easily modify characters for a project which work on the ‘biped’ skeletal system.

* General keyframing: There are two keying modes; auto key and set key which provide support for separate workflows. The keyframing controls given help in easing the animation by providing simple, but important features like cut, copy and paste.

* Constrained animation: It allows animation of objects placed inside the constraints of their shape. This tool allows the animation of objects along curves with controls provided for smoothness, velocity, alignment, banking etc. and along surfaces.

* Skinning: Using with the Physique or Skin, a fine control of movement can be achieved and can be used in the most tricky of places.

* Integration with Autodesk Vault plug-in: The Autodesk Vault is a plug-in which is shipped along with 3ds Max and is used to integrate user data and assets on to one location, thus tracking progress on projects. Also, managing work in progress is an easier task. The plug-in enables users to safely and easily design, find, reuse and share 3ds Max models for a team production effort.


Conclusion

All in all, Autodesk 3ds Max is a useful software for learning and practicing animation and developing the skills required for 3D modeling and animation purposes. Along with having a very user friendly interface, it also can be used for managing professional projects in animation. One of the best features is added plug-in functionality which increases its features by a wide margin.

Categories
Post

The 5 best new 3D tools for April

This time of year can often be a quiet one for those of us working in 3D art and visual effects, with developers gearing up for the events season and new releases being a bit thin on the ground.

However there are a few notable updates and newcomers, so have a read below to see what could help you improve your work or help you be more efficient.

01. Modo 10 series

Modo has been around for a while but continues to develop and grow

Recently announced is the latest version of the now long running Modo, the full solution for 3D artists that includes tools for modelling and texturing animation and rendering. Previous updates had followed the x01 naming convention, lending a feeling of continuity to the brand but The Foundry have broken from that with what would have been 1001. Instead they have refocussed a little and changed the way they are targeting their products.

10.0 v1 is the first of the new system and is aimed squarely at the interactive market, so if you are on the lookout for a solid 3D app for your VR work or game content then this is the one you want. It hasn’t quite been released at the time of writing but it’s just around the corner and will be followed later by 10.1 and 10.2 which will each have their own focus.

02. NVIDIA Iray VR and Iray VR Lite

Rendering power is steadily moving to the GPU and Iray VR looks set to a strong contender

Most artists will usually have thoughts of graphics cards when you mention the name NVIDIA but they are also software developers and one of their main applications of recent years is Iray, now with additional versions for VR. Iray VR has many uses but the obvious benefits are for engineers and architects, where they will be able visualize not just form and function but also lighting interaction.

If you are into architectural visualization and want a step up then look at Iray VR, as it will let you light your spaces on the fly without the process of having to wait for test renders. Imagine taking the power of your GPU to run interactive demos to clients, showing them how their desgins will look in any situation. VR looks to be having a resurgence and Iray wants in on the party.

03. Forest Pack 5 and Railclone 2.6

These two heavy hitting max plugins are well respected and rightly so

Possibly the best known plugins for 3ds Max is this pairing from iToo. Well regarded even amongst non-Max users, the software’s abilities in rapidly populating a scene in an organic yet controllable way has always been a huge benefit but they’ve announced their newest version which promises to add even more features.

There are a few new features for both apps but the main ones are expression support, so all you maths tweakers can use expressions to control your clones and their placements. Second up and one that will please many is support for V-Ray 3.3 including motion blur.

Check the website for a full list of new options as there are many new render options and a bunch of GUI options which make for more efficient working.

04. popVideo 3

The popVideo keying tools allow easy background removal, with a single colour picker

If you work in VFX it’s pretty likely you will have to work with green or blue screen footage. That’s okay and working with different keying solutions is getting easier but there’s still a lot of room for improvement. Reallusion has announced its latest version of popVideo, which includes some simple to use keying options that have sophisticated uses.

Using popVideo you aren’t limited to the tradition blue or green screen studios but can effectively remove any colour background. The possibilities this opens up are enormous, from basic paper rolls that can bought from any photo supplies shop to working with sky removals or annoying artefacts. The tools is operated with a colour picker meaning traditional chroma values aren’t a limitation.

05. Pixel lab NAB sale

The pixel lab packs are winners for quality and price

If you are a Cinema 4D artist and need plugins, materials and models then look no further. Joren Kandel has a huge range which is growing steadily, month by month. The news here is that he is currently running an NAB sale where you can save over $1000 on the complete set of products. Sales like this don’t come around that often and, although this isn’t about a specific product, it’s well worth sharing.

Many of the items are After Effects compatible too, so check it out. Even out of sale these packs are heavily discounted and well worth investigating.

Categories
Articles Learning

Introduction To Auto desk AutoCAD | DAY 2

Learn AutoCAD basics: DAY 2

Not like the previous DAY, we are going to start learning cool things today. Not to say that DAY 1 was useless, that helped to warm up.

We have lately learn the basic basics in AutoCAD, and you should by now know the environment and I have no doubt that you are familiar with common words used here to describe stuff such as Command window, Status Bar, Navigation bar…

LEARN AUTOCAD BASICS

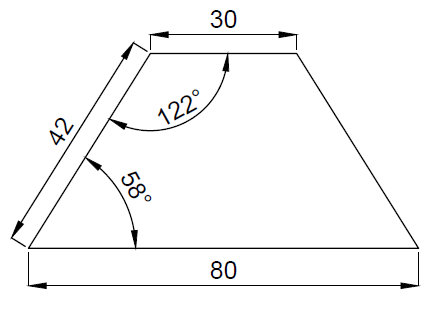
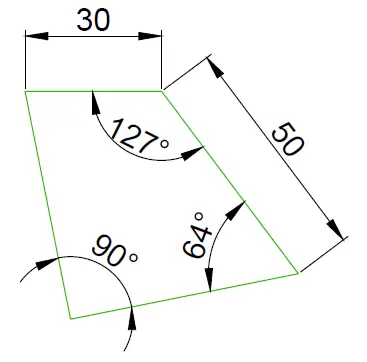
We will use the image below, and try learning all things we need to learn to be able to create something similar using AutoCAD.

We’ve learned a little how to use the coordinate system to create lines in AutoCAD. In this Session, we will forget a little about the Cartesian coordinate system.

learn-AutoCAD

It is true that using the Cartesian coordinate system we could draw lines with specified dimension, but this method is more convenient and is the one you will be making use of in the future.

Read more about how you can create lines and play with their angle

EXECUTION

To create the image above

STEP 1

Draw the line of 80 units

  1. Click on LINE
  2. Specify the first point
  3. Make sure the ORTHO mode is ON, Move your mouse rightward, type 80 and Press Enter
  4. Press Esc

STEP 2

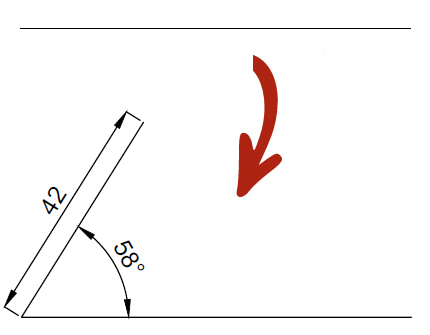
Start the second line from the first point of the 80 units line, and draw the second line with an inclination angle of 58 degrees.

learn-AutoCAD

STEP 3

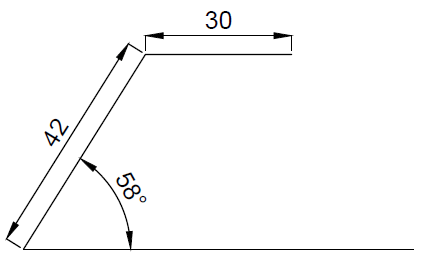
Draw the third line. It is a straight horizontal line.

learn-AutoCAD

STEP 4

All you have to do now is to create a line from the 2 open points shown on the figure in step 3.

EXERCISE

Here is a good exercise that will help you practice what we have just learned. I will suggest youlearn how to use the ROTATE command in AutoCAD before trying to do the following exercise.

Autocad-tutorial

In case of difficulties, I would like you to know that I solved this step by step few days earlier.

Categories
Articles Learning

Introduction To Auto desk AutoCAD | DAY 1

Learn AutoCAD basics: DAY 1

Welcome to Learn AutoCAD 2D basics in 21 DAYS!

Here is the first DAY. We will on this journey make use of all basic commands in AutoCAD.

The  Attempt: Handing you enough skills that you give you confidence to continue learning auto-didactically.


LEARNING AUTOCAD BASICS

Today we will start from what you need to know on Day 1. You need to have visited theseAutoCAD tutorial before diving into the following. (Jump this step and read further down, if you feel that you can handle the rest of the content without needing anything else, feel free to do so).

COORDINATE SYSTEM

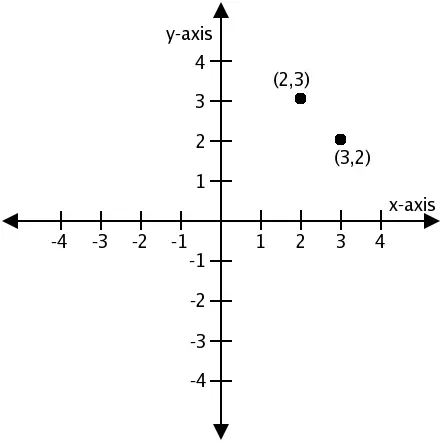
In AutoCAD, the Drawing Area is composed by a sheet in which every location has the particularity of having its own coordinate represented by x, y and z.

Learn-AutoCAD

Since we are going to be solely working in 2D in this series, we can forget about the z component of the coordinate system.

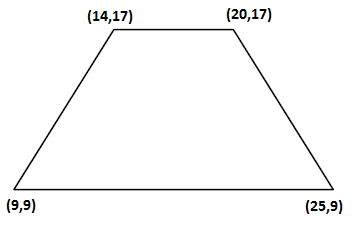
Looking at the following image, you will notice that each corner of the figure has a coordinates.

Learn-AutoCAD

Though it is true you wont be using this a lot while drawing in AutoCAD, we will spend a minute talking about it. At this point, I will suggest you disable the Dynamic input before trying the following.

We will try creating the previous image using the coordinate system and the command window. It is simple, the concept will be to use the four points to draw the quadrilateral.

To do that using autoCAD:

1. Type LINE and Press Enter
2. Type 9,9 and Press Enter
3. Type 25,9 and Press Enter
4. Type 20,17 Press Enter
5. Type 14,17 Press Enter
6. Type 9,9 And Press Enter
7. Press Esc

The first step allows to activate the LINE command. (Learn more about the LINE command)

The second step allows to specify the starting point of the line and the same goes for next steps.

The last Step allows to Cancel the LINE command.

In AutoCAD stroking Esc (ESCAPE) allows to exit a command.

At this stage, you are not using the computer mouse, and you are require to pay close attention to the command windows while drawing. As we go, we will learn more about the command windows and how to use your mouse in AutoCAD.

EXERCISE

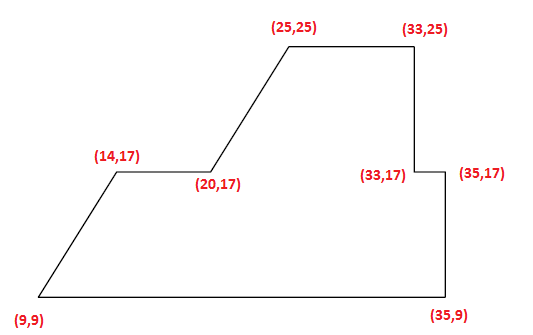
Use the technique we have just learned to create the following.

learn-AutoCAD

Note you can start from any point.

Categories
Project types Site Planning

Altun City

Type
Residential Complex

Year
2011
Locatio
Erbil
Style
Modern
Situation
Completed
Sector
Private - Residential
Description:
Project complete and modern city is located in the city of Arbil on via a built Bnaslawe and project consists of 800 housing units with an area of 200 square meters per unit has been sold all residential units very shortly: 1-Build a school key 2-Building kindergarten 3-Building custody 4-Building a health center 5-Building markets and buildings business 6-Build a mosque 7-Diging wells and installing network of drinking water 8-Building a police station in the city 9-Put drainage system sewage and rainwater 10-Paving the internal streets of the lawmaker 11-Create a commercial complex feeds the city needs daily 12-Monument power distribution network 13-To address the valley within the city 14-And the installation of a processing wastewater treatment with water distribution network processor
Twitter
Visit Us
Follow Me
Youtube
Youtube
Pinterest
Pinterest
fb-share-icon
LinkedIn
Share
INSTAGRAM